📖 Table of Content:
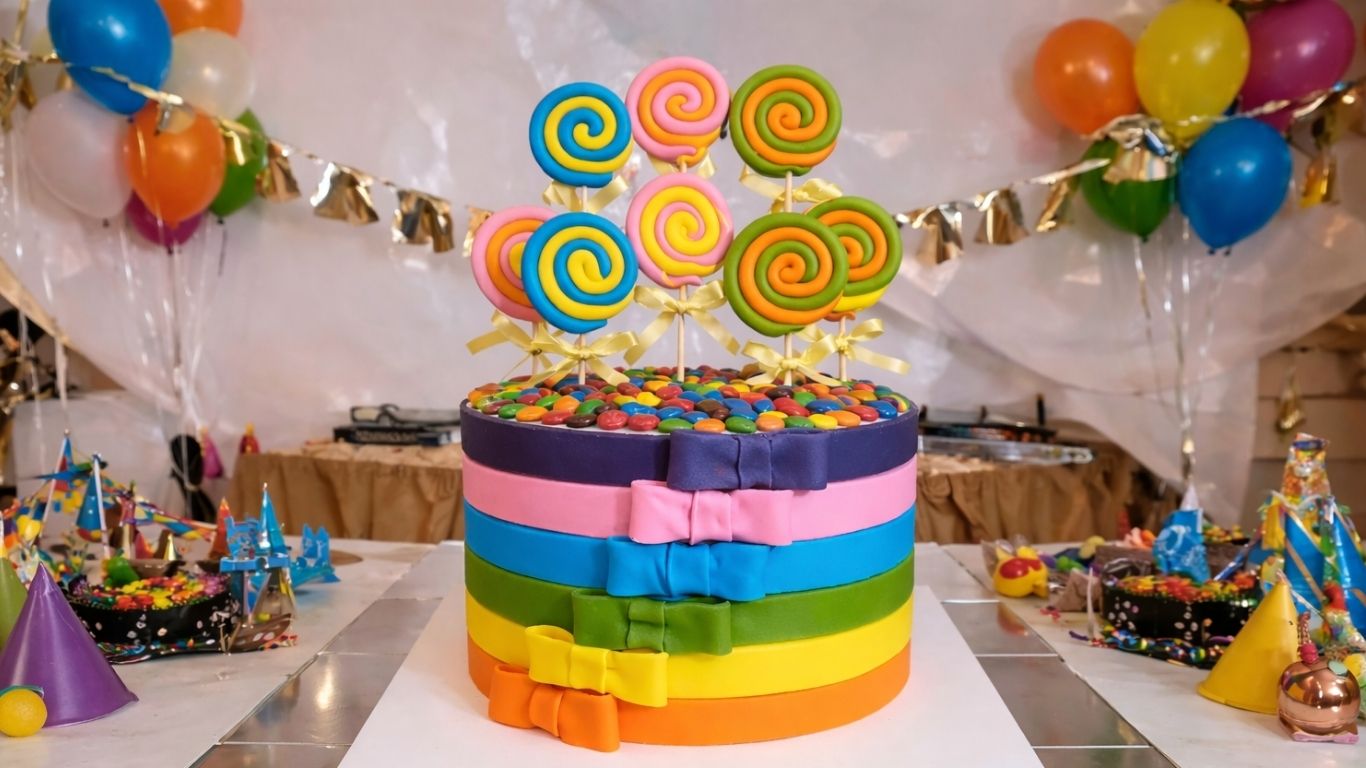
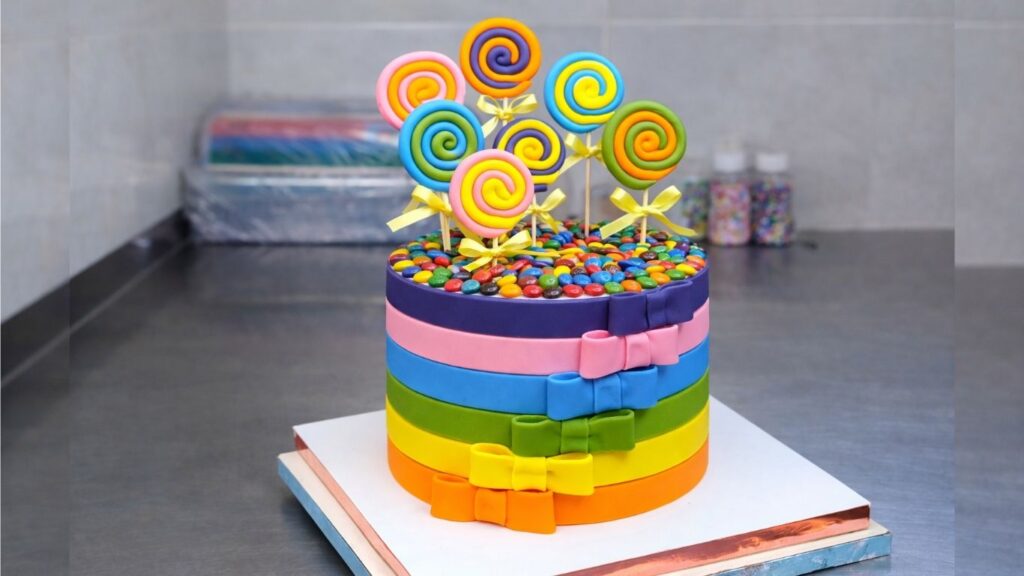
A rainbow candy cake is one of the easiest ways to create a big birthday wow effect without complicated decorating skills. It looks like a tall, colorful cake, but the star of the design is the candy layout, especially the lollipops and the bright rainbow bands. In this guide, you will learn how to make a candy cake step by step, using simple supplies and a clean method that helps everything stay neat and secure. By the end, you will have a party ready candy cake that works for birthdays, candy themed celebrations, and fun dessert tables.
If you want a smooth, polished finish, it helps to start with the right base and the right details. For the rainbow bands and bow, use my Fondant Recipe here.
If you are building a real cake underneath, my Buttercream Recipe here, will help you get clean edges and a stable surface.
Since a candy cake involves a lot of hands on decorating, it is worth following basic food safety steps like keeping your workspace clean and chilling the cake when needed. You can review the official guidelines here: https://www.foodsafety.gov/keep-food-safe/4-steps-to-food-safety
What You’ll Need for This Candy Cake
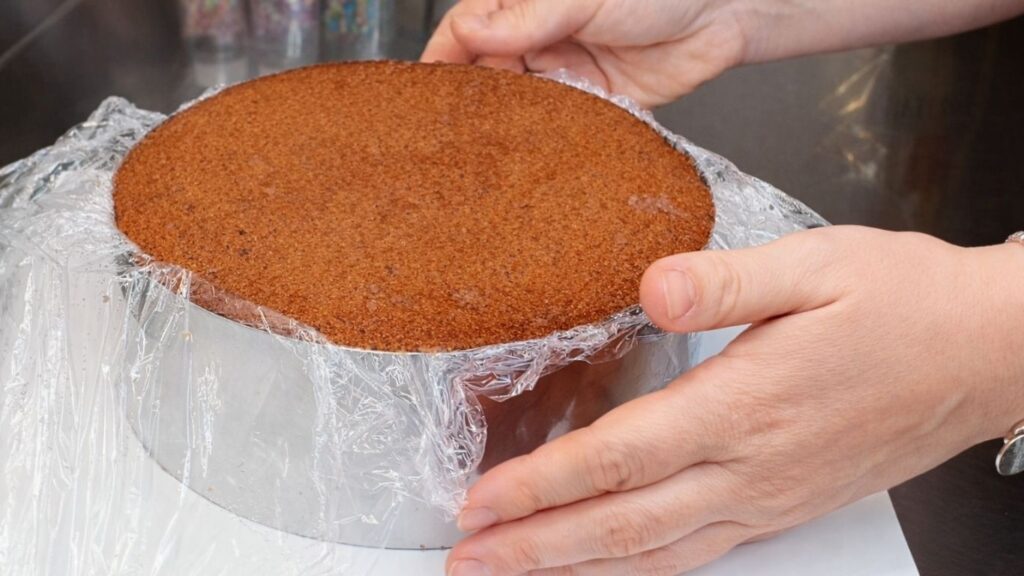
For this candy cake, I used two 20 cm (8 inch) chocolate cake layers to create extra height. The cakes were filled with chocolate cream, then coated in a smooth layer of my buttercream to give a clean base for decorating.
Cake and filling
- 2 chocolate cakes, 20 cm (8 inch) each, stacked for double height
- Chocolate cream filling
- Buttercream frosting (my recipe)
Fondant decorations
- Fondant in multiple colors for the rainbow bands
- Handmade fondant lollipops
- Handmade fondant bows
- Wilton strip cutter to cut even fondant bands
- Small rolling pin
- Water and a small food safe brush for attaching fondant
Candy and supports
- M&M’s or similar candy coated chocolates
- Wooden skewers (kebab sticks) for the lollipop toppers
- Satin ribbon bows tied onto the sticks for a finished look
Why You’ll Love This Candy Cake
This candy cake is a fun birthday centerpiece that looks impressive but is simple to assemble once the base cake is ready.
It is easy to customize with any color palette, theme, or candy selection, so you can match it to a party table in minutes.
The tall, double height cake gives you more space for decorations, while the buttercream coating keeps everything looking smooth and clean.

Homemade fondant lollipops, bows, and rainbow bands add a professional finish without needing advanced piping skills.
It photographs beautifully from every angle, which makes this candy cake perfect for birthdays, celebrations, and party content.
How to Make a Candy Cake
For this candy cake, I used a double height 8 inch (20 cm) chocolate cake because it gives the prettiest proportions and yields plenty of servings. You can use any cake flavor you like.
The most important part is stability. Make sure your cake and filling are firm enough to hold the weight of the decorations. For best results, assemble the cake and let it chill in the refrigerator overnight, so everything sets and stays solid while you decorate.
Step 1: Stack the cakes
Remove the fully cooled cakes from the pans and place one layer on top of the other to create a taller base for your candy cake.
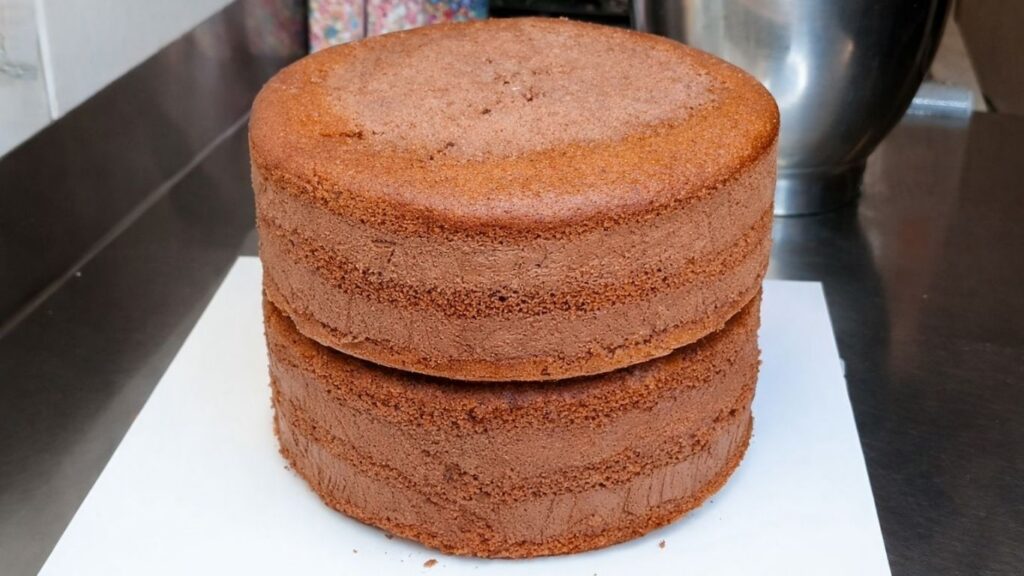
If your filling is soft or the cake layers feel delicate, add a few support sticks in the bottom cake and place a small plate or cake board on top before stacking. This helps distribute the weight and prevents the bottom layer from squeezing out filling.
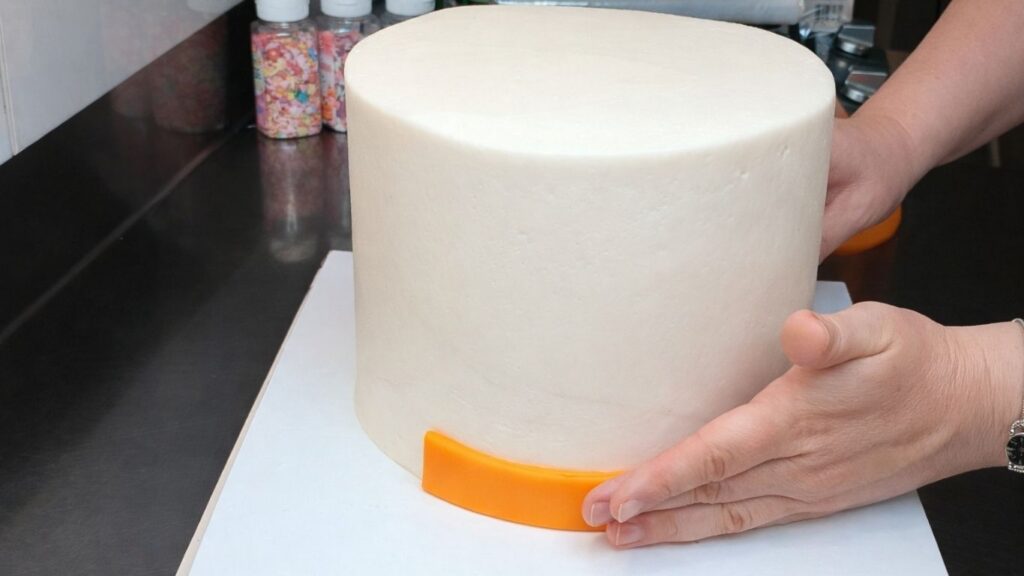
Step 2: Add the buttercream coating
Prepare your buttercream, then start with a thin first coat over the entire cake. This layer is your foundation, it fills tiny holes, locks in crumbs, and helps you build a clean shape before you focus on the final finish.
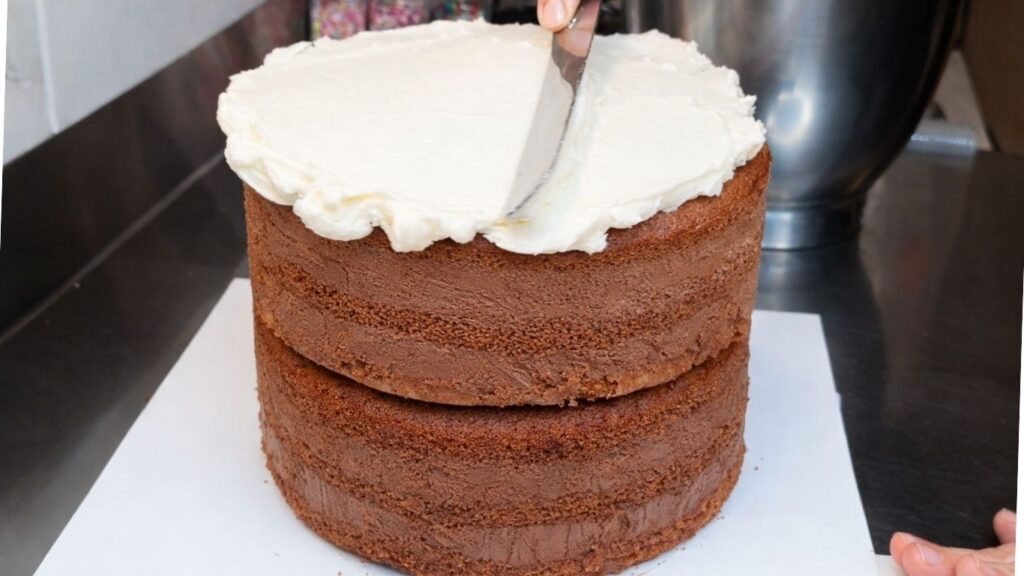
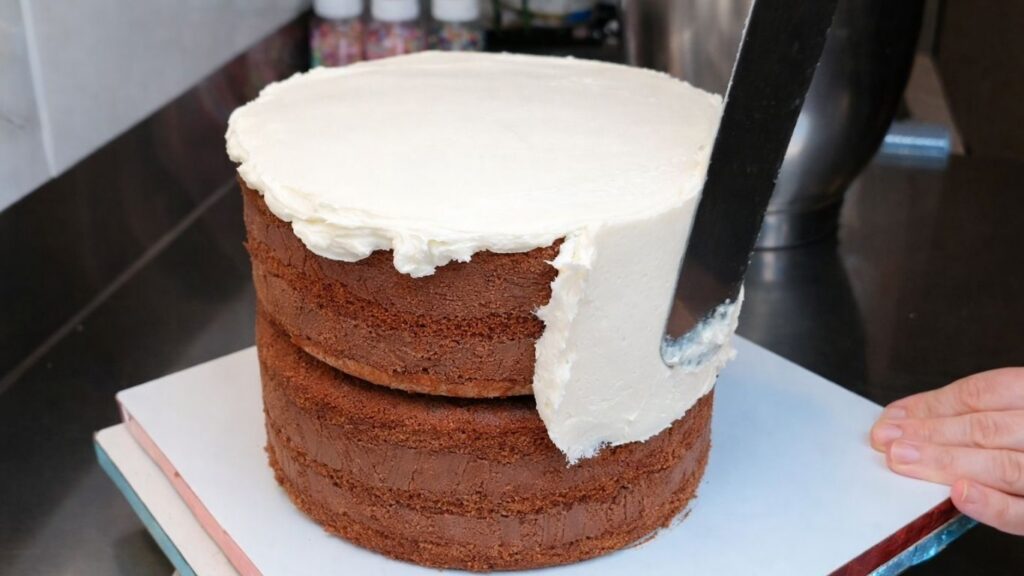
I always begin on the top. Add a generous spoonful of buttercream and spread it outward to the edges, keeping the surface as level as possible. Once the top is covered, move to the sides and apply buttercream all around the cake. At this stage, do not worry about perfection. The goal is full coverage and a firm, even outline.
Use a scraper or spatula to lightly smooth the sides and sharpen the top edge. If you notice gaps, dents, or uneven spots, add a little more buttercream and smooth again. Taking time here makes a big difference, because a straight, tidy base helps the candy cake look polished once the decorations are added.
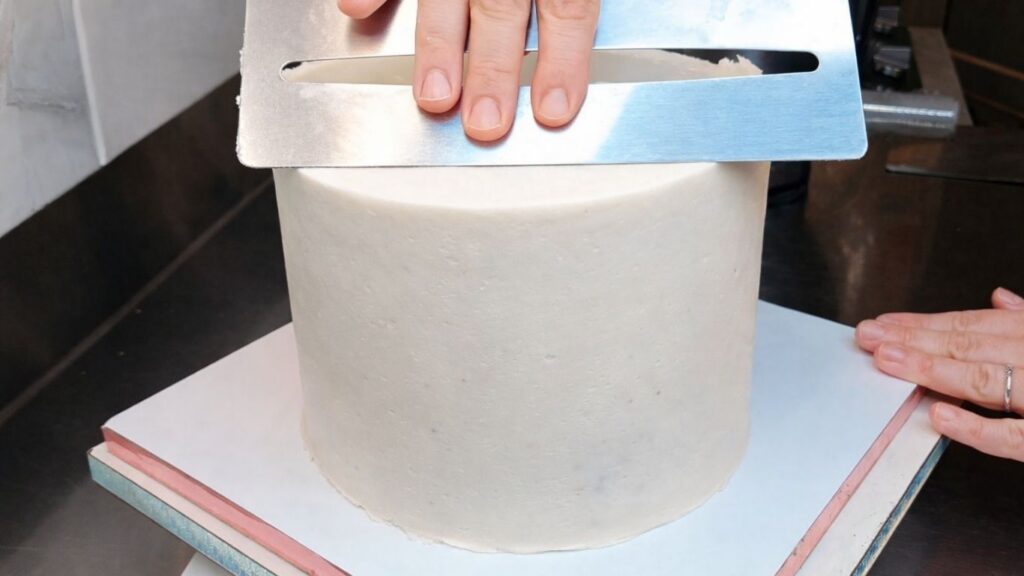
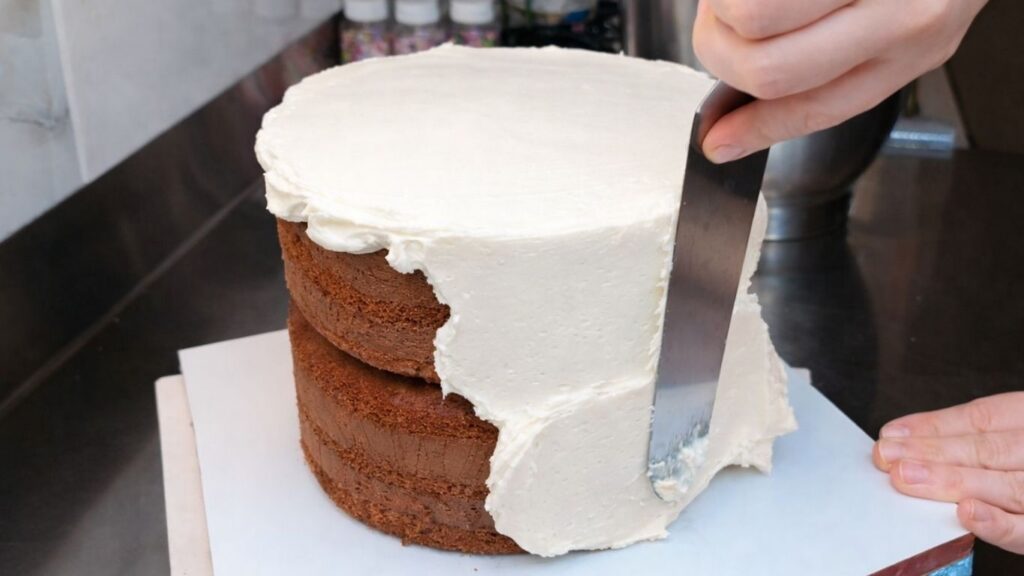
After the first coat, place the cake in the refrigerator for about 15 minutes. Chilling helps the buttercream set, so the next layer goes on cleanly without pulling or tearing.
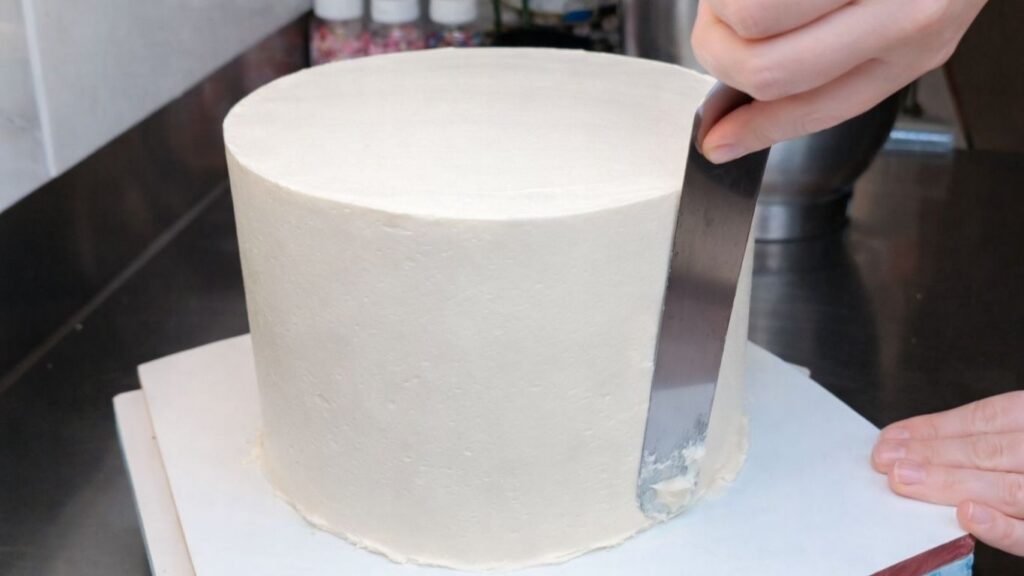
For the second coat, add a slightly thicker layer of buttercream and smooth it carefully. Work slowly, turning the cake as you go, until the sides look even and the top edge is neat. When you are happy with the shape, chill the cake again briefly so it stays firm while you move on to the fondant details.
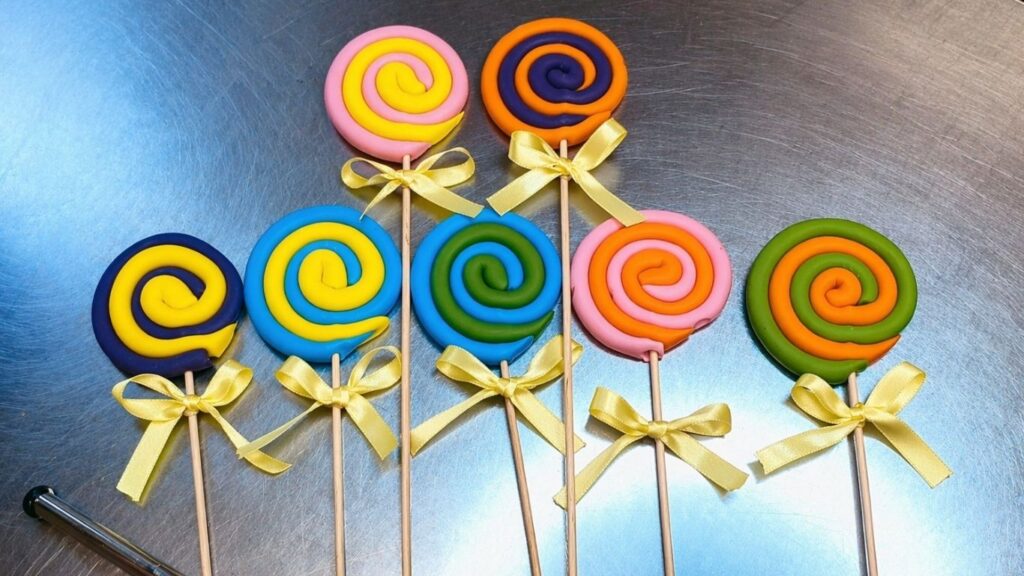
Step 3: Make the fondant lollipops and bows
While the second buttercream layer is chilling, start preparing the decorations. I like to make the fondant lollipops first, then the bows, so everything is ready once the cake is firm.
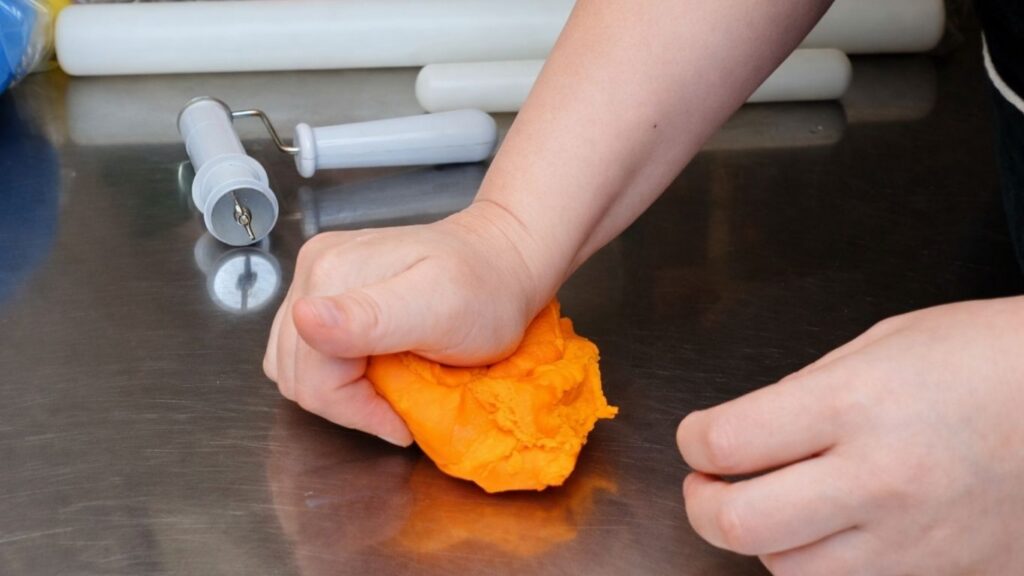
Begin by kneading the fondant in your hands until it feels soft and flexible. Roll it out to an even thickness, then pull off two fondant ropes of the same length. Repeat this with every color you plan to use on the candy cake, keeping the ropes similar in thickness so the finished lollipops look neat and balanced.
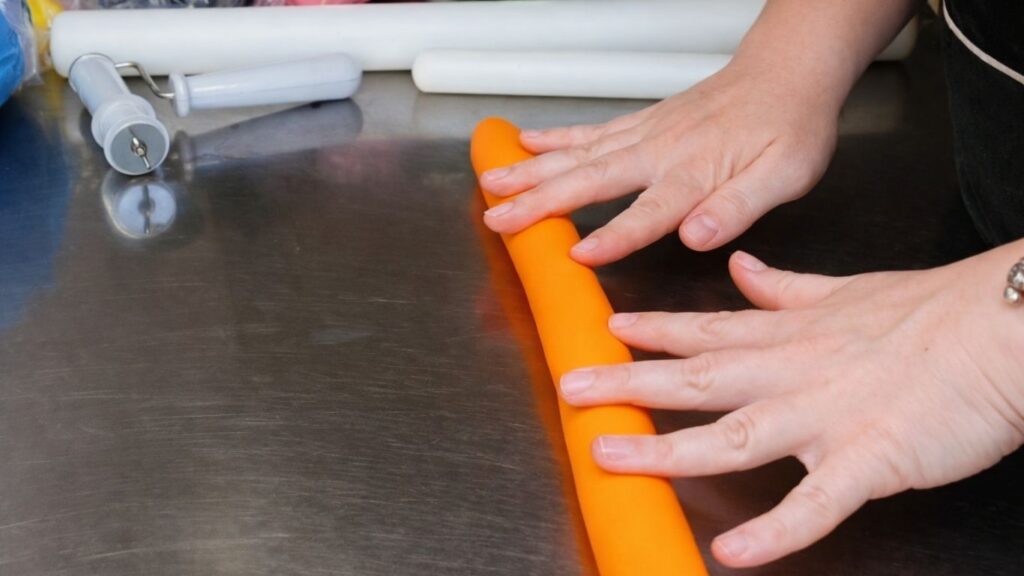
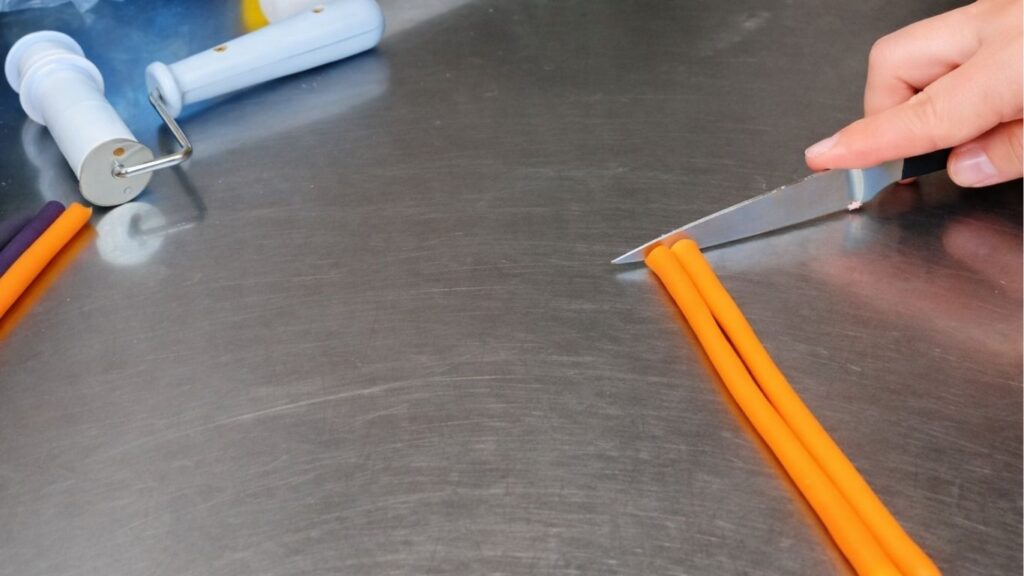
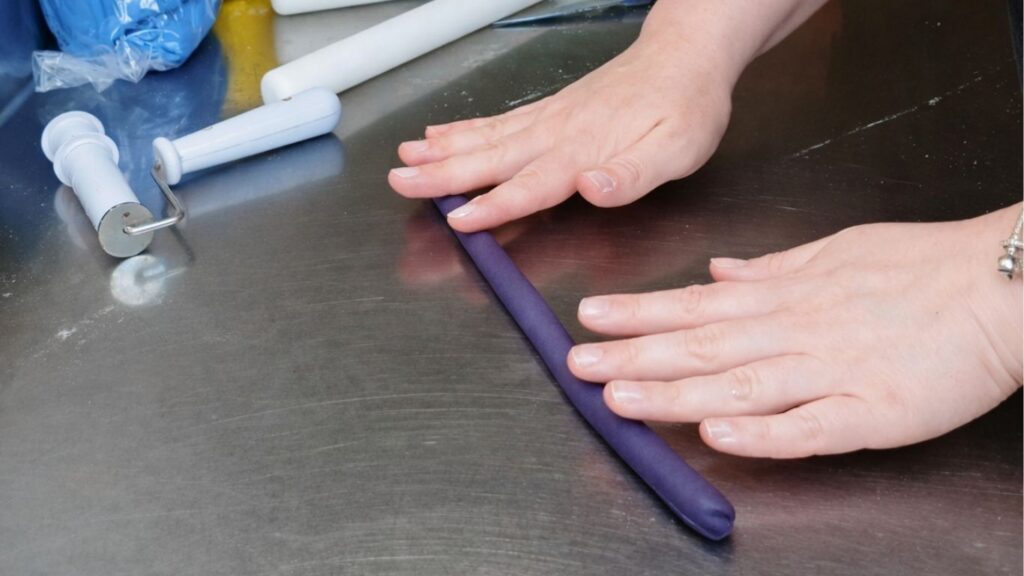
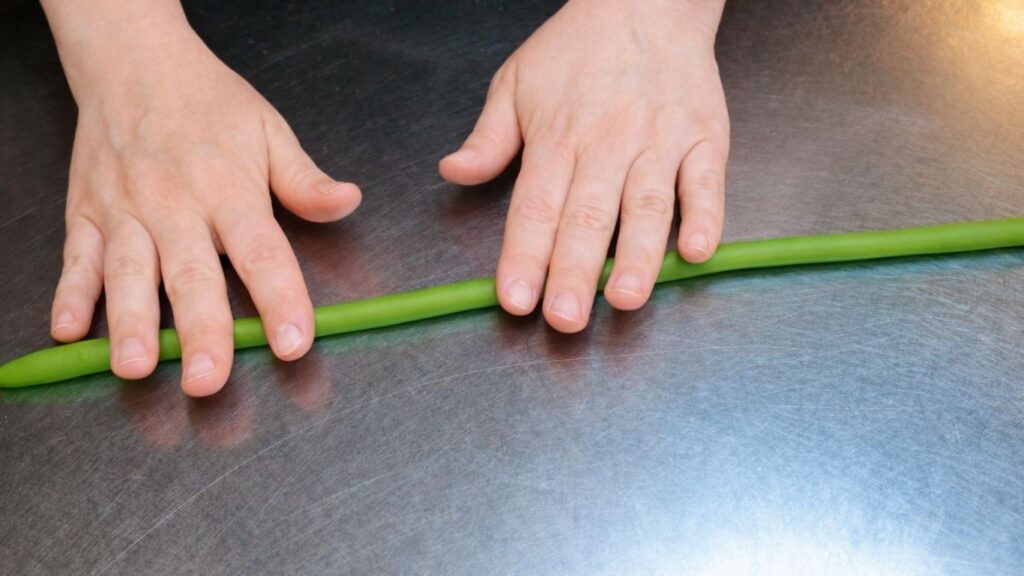
When your colors are ready, choose two ropes and brush a very light layer of water between them so they stick together. Press gently, then twist or roll them together to create one two tone rope. Starting from one end, coil the rope into a spiral to form a lollipop shape. Tuck the end underneath to keep it secure.

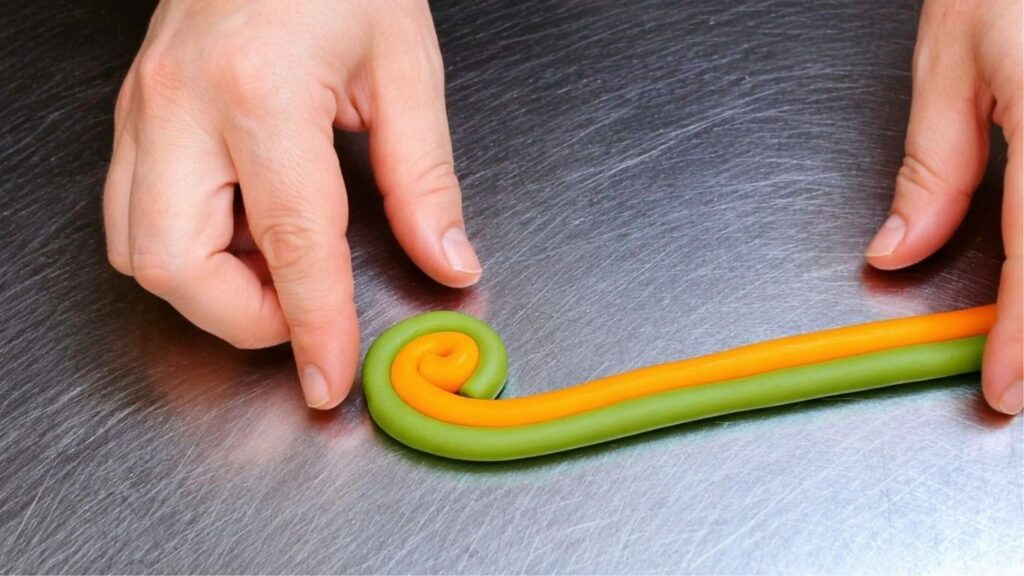
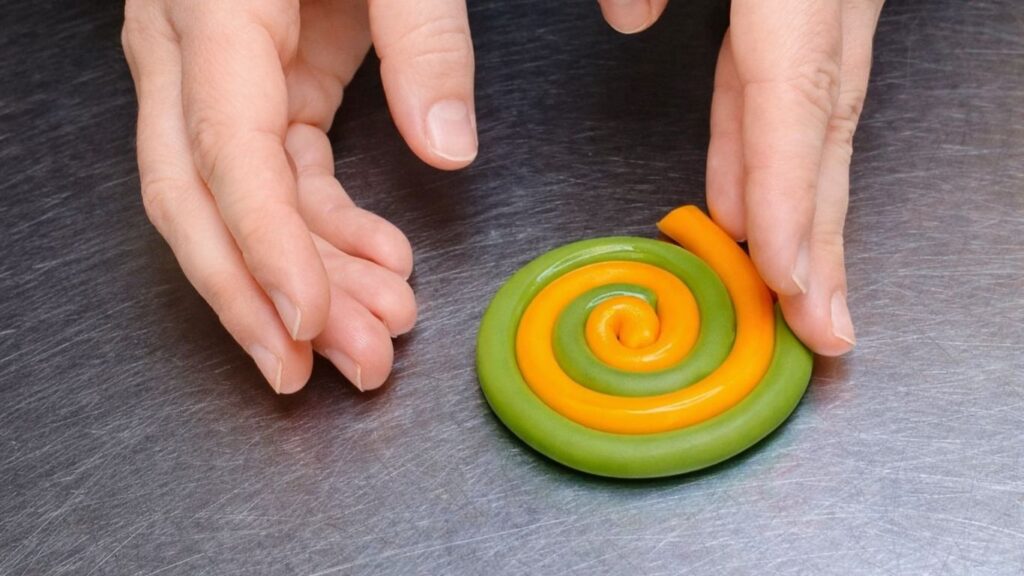
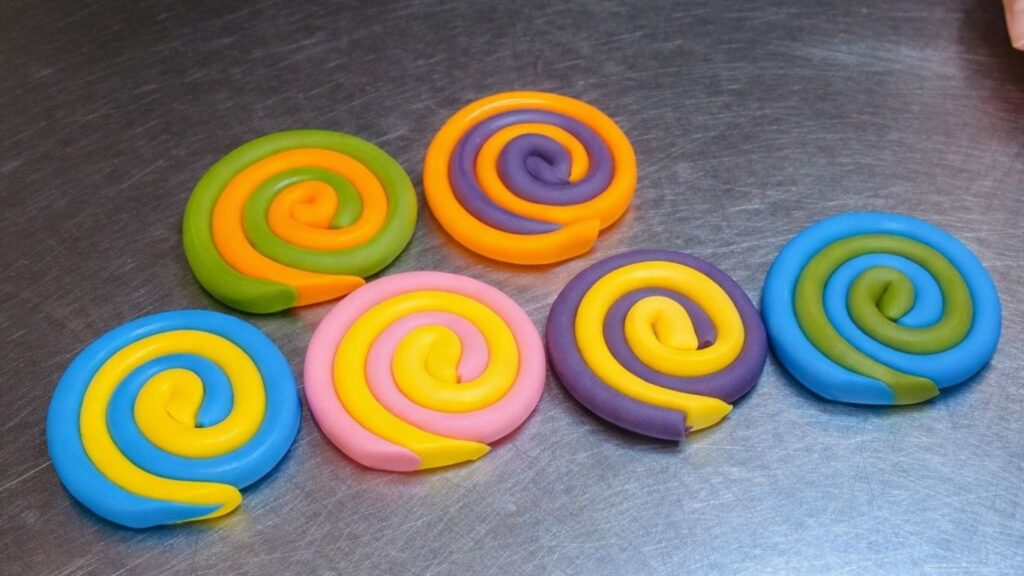
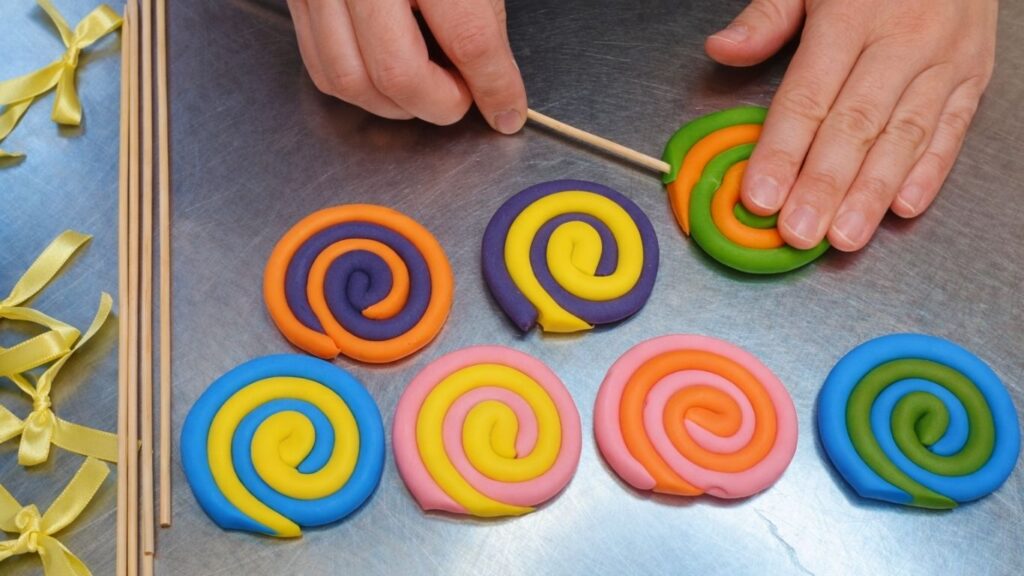
Repeat the same process with the remaining colors until you have enough fondant lollipops for the top of the cake. Keep them on a clean surface while you move on to the bows.
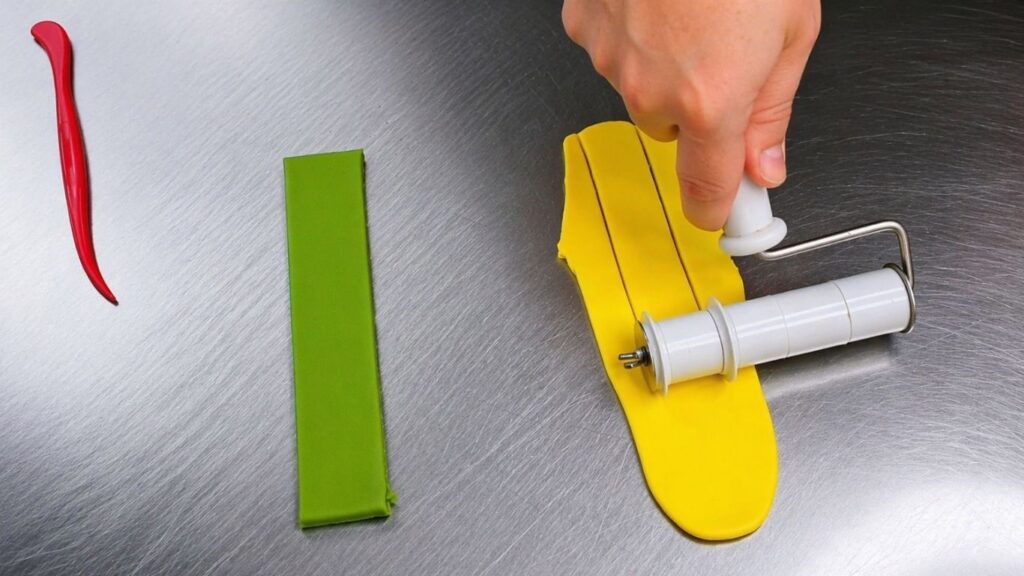
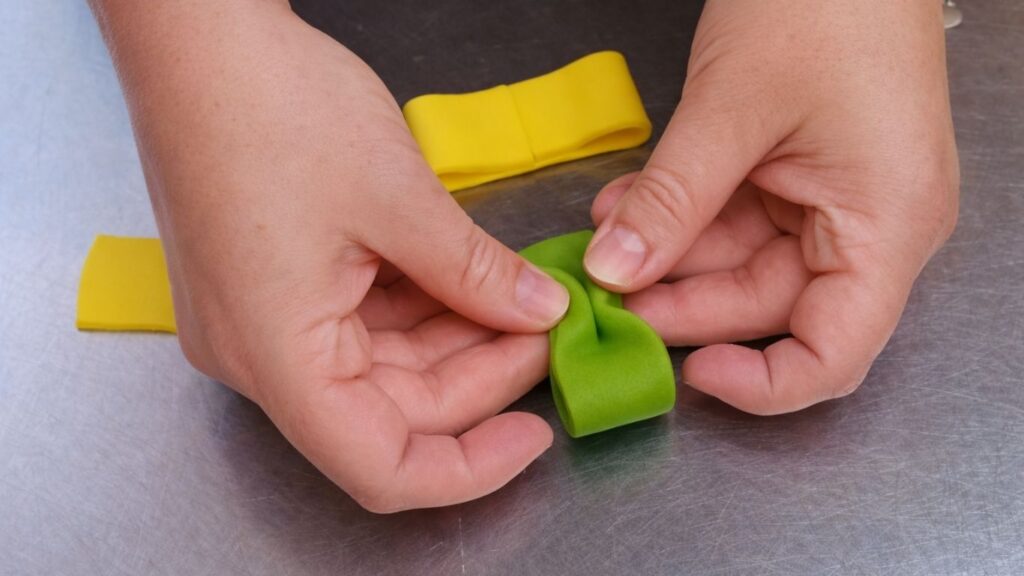
Now it is time to make the bows. Start by kneading the fondant in your hands until it is smooth and pliable. Lightly dust your surface if needed, then roll the fondant out with a small rolling pin into a thin, even sheet.
Use a Wilton strip cutter to cut clean, even strips. Decide how long you want each bow to be, then cut the strips to size. Keeping the lengths consistent will make the finished candy cake look more polished.
To shape a bow, brush a tiny amount of water along the strip, then fold both ends inward so they meet in the middle. Press gently to help it hold its shape. Pinch the center lightly with your fingers to create the classic bow look and add a bit of volume.
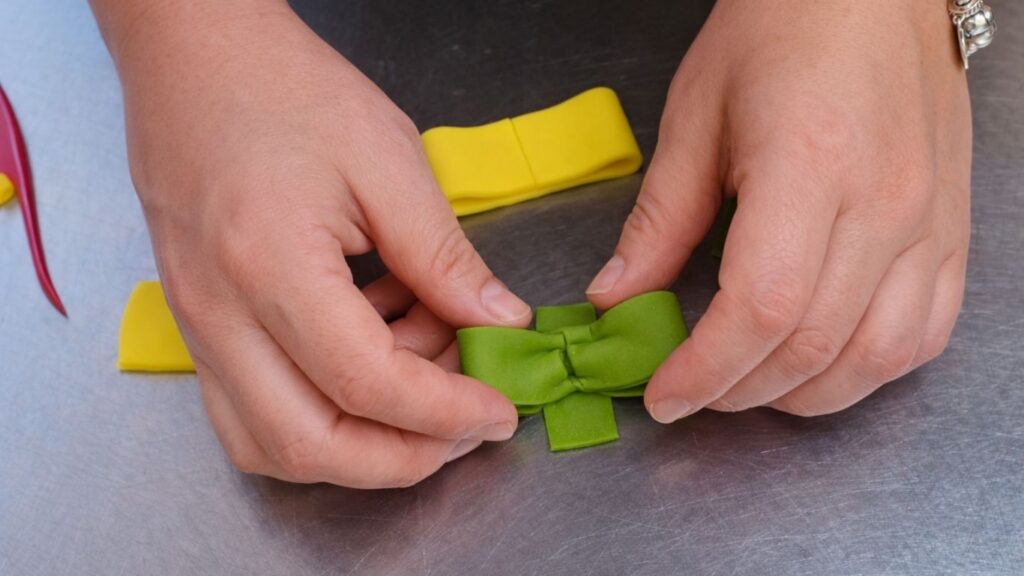
Cut a very thin strip of fondant and wrap it around the center to hide the seam and create the bow knot. Press it in place, trim any excess, and smooth the edges with your fingers.
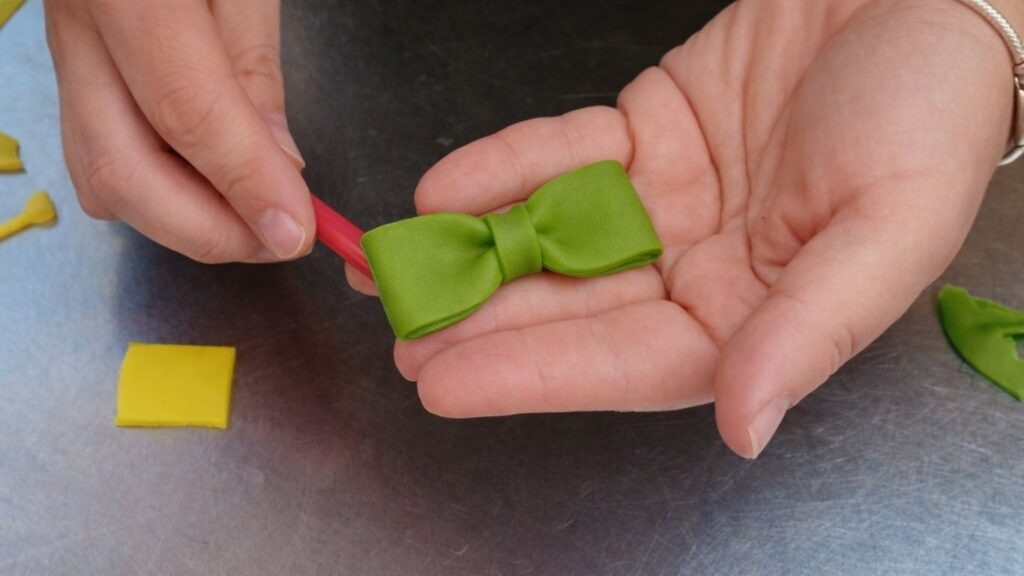
Repeat this process with all the colors you want to use, then set the bows aside to firm up while you move on to the next decorating step.
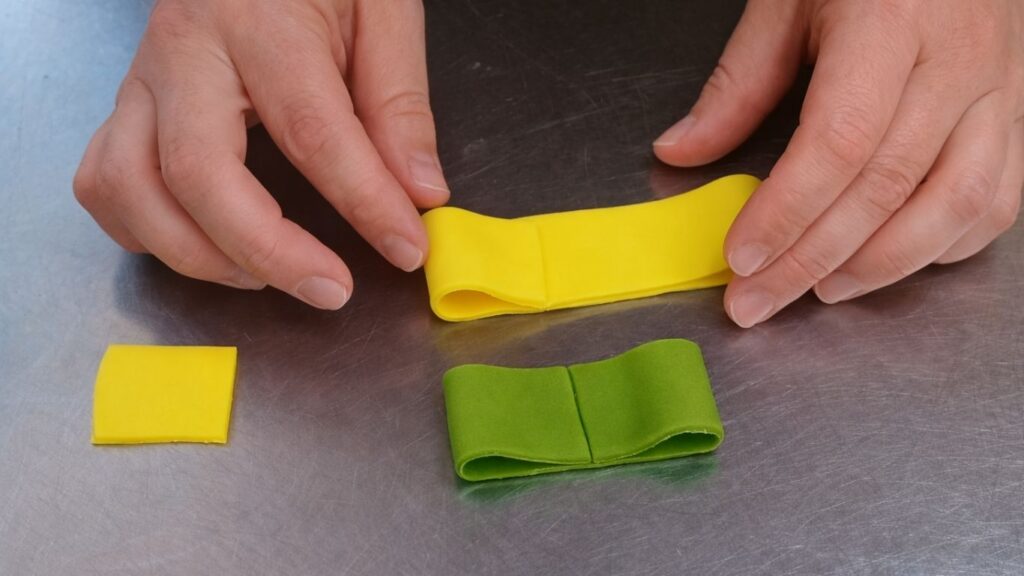
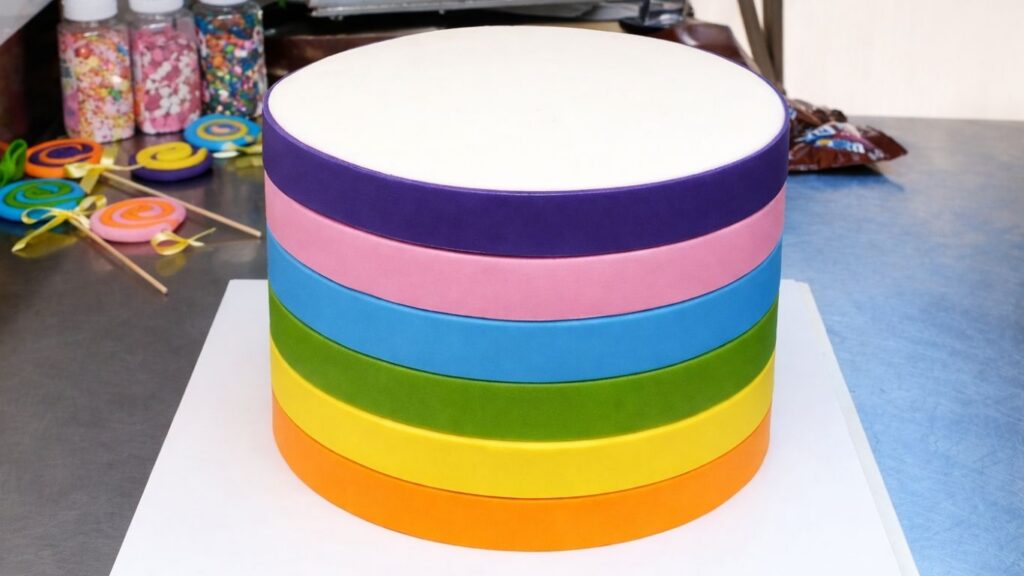
Step 4: Cut the fondant bands for the cake
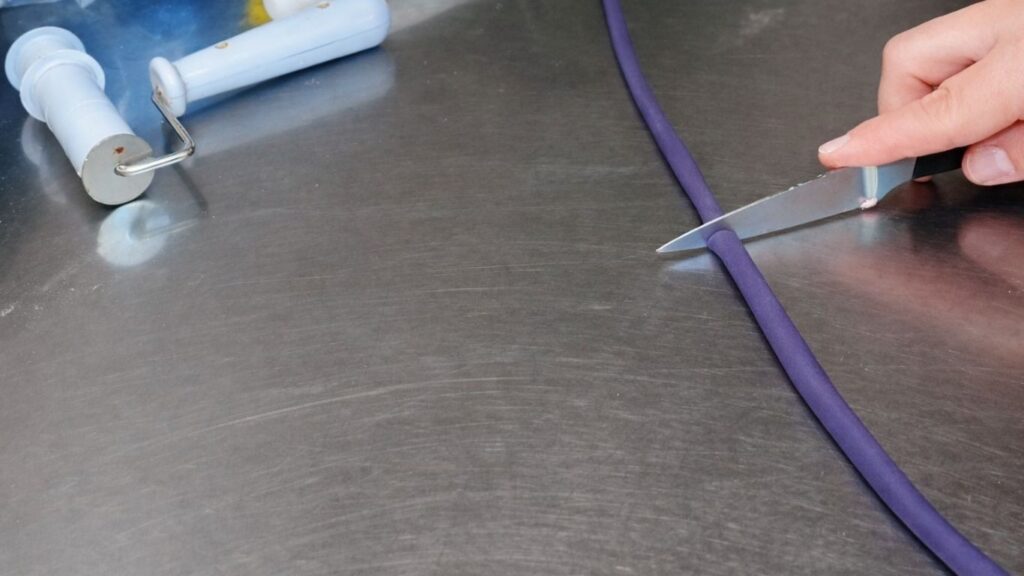
Now prepare the fondant bands that will wrap around the cake. Take one color of fondant and warm it in your hands by kneading until it becomes soft and easy to work with. Shape it into a short log, then roll it out with a small rolling pin until it is smooth and an even thickness.


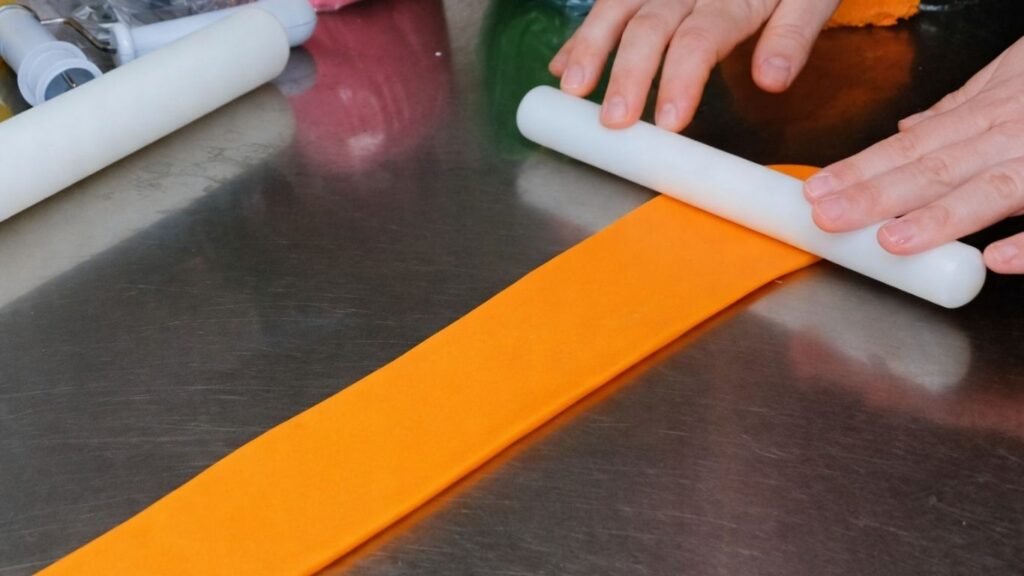
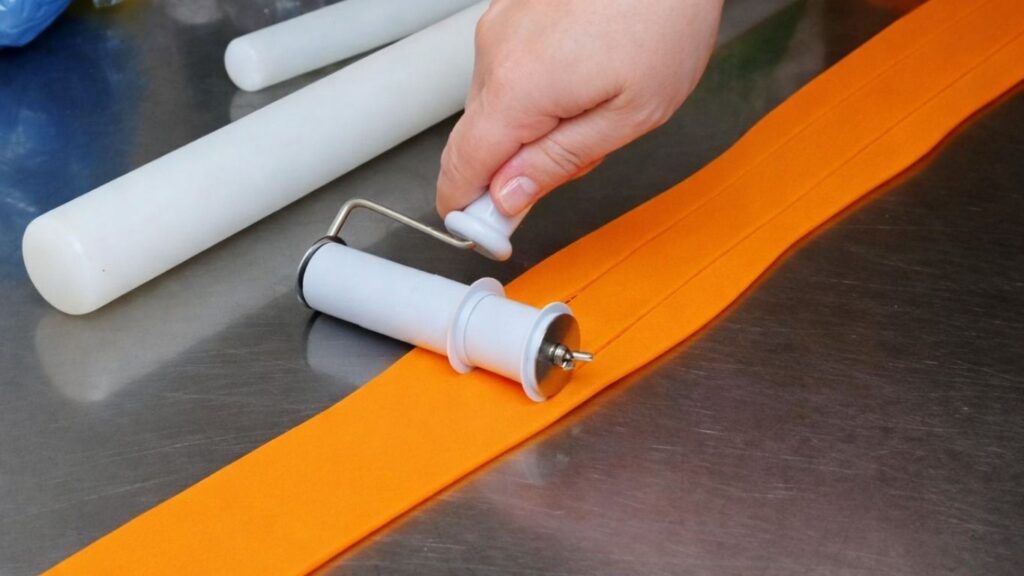
Use a Wilton strip cutter to cut clean, straight strips. These will become the rainbow bands on your candy cake, so try to keep the thickness consistent for a neat, professional look.
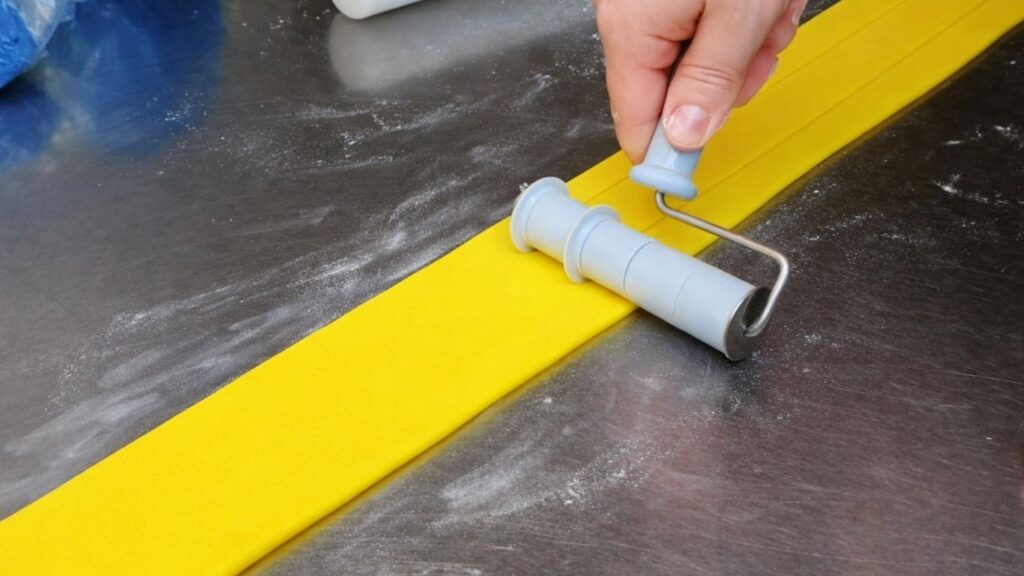
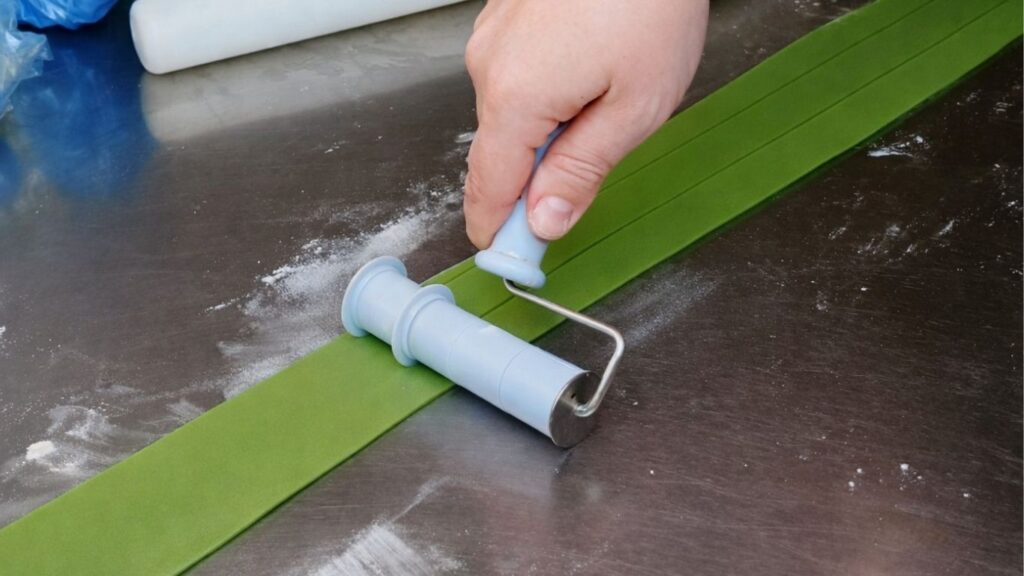
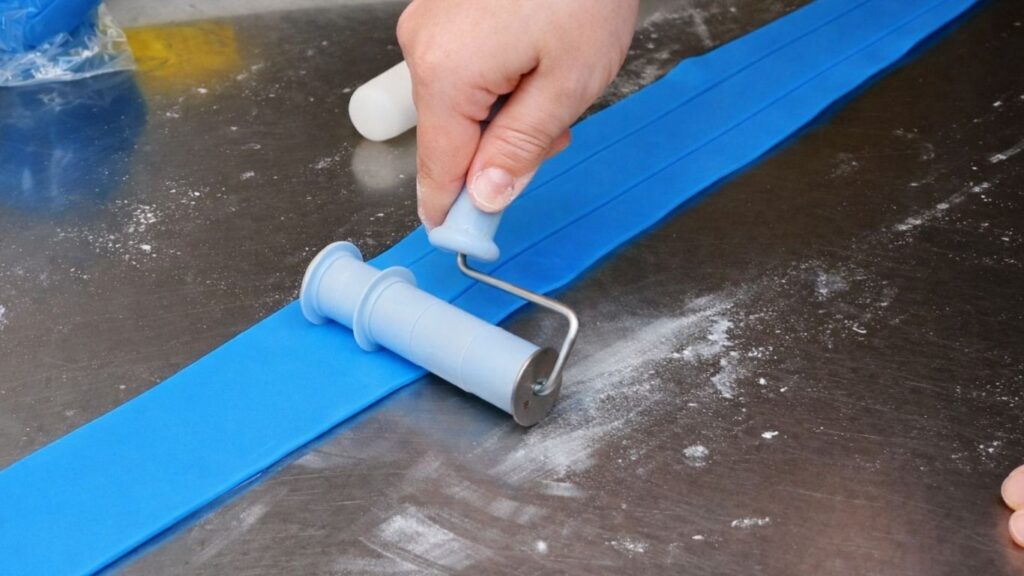
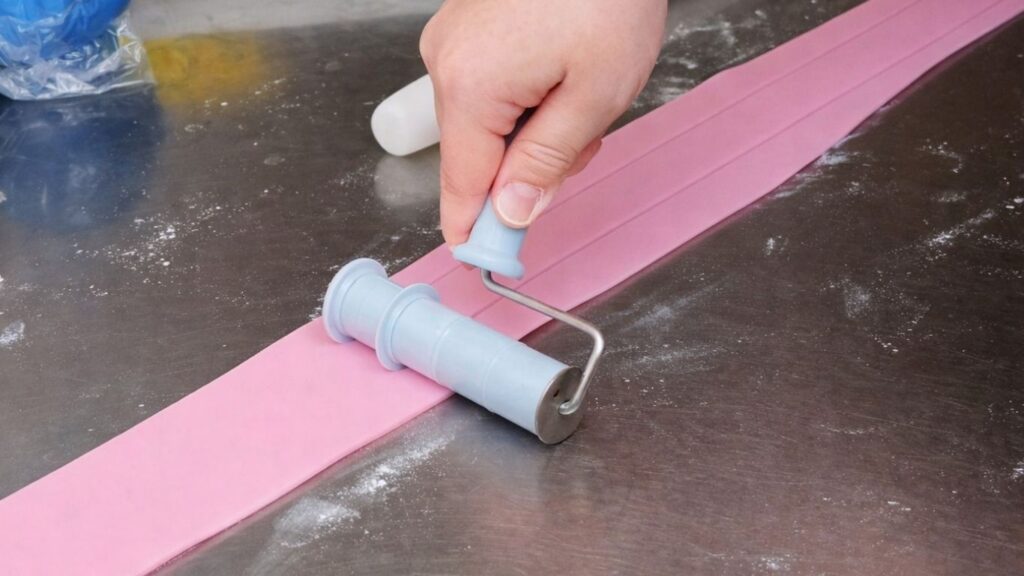
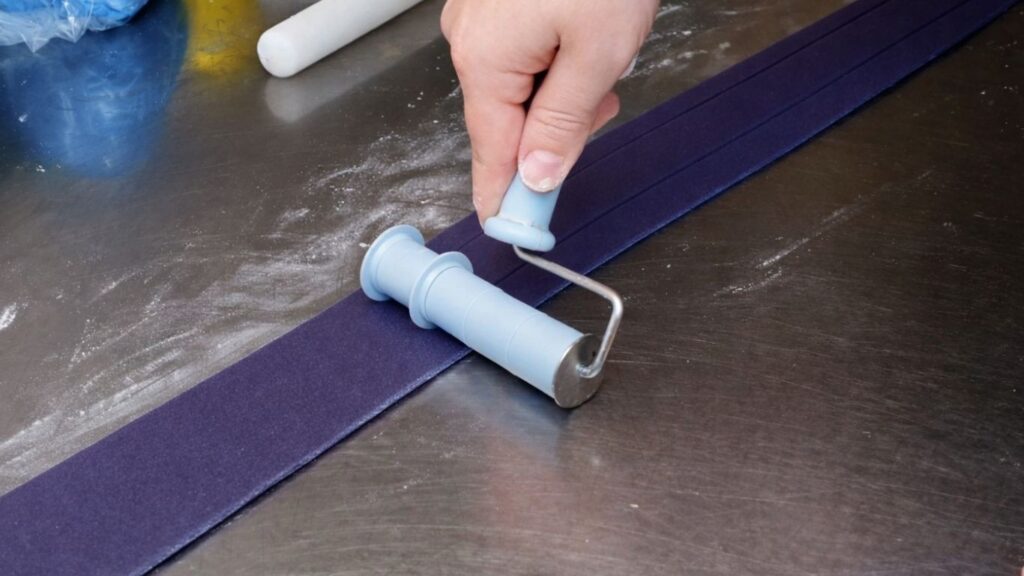
Repeat the same process with each color you chose. Knead, roll, and cut the strips, then set them aside in order so they are ready to attach to the cake in the next step.
Step 5: Attach the fondant bands
Once all the strips are cut, take the chilled cake out of the refrigerator. Starting at the bottom of the cake, begin attaching the fondant bands and work your way upward.
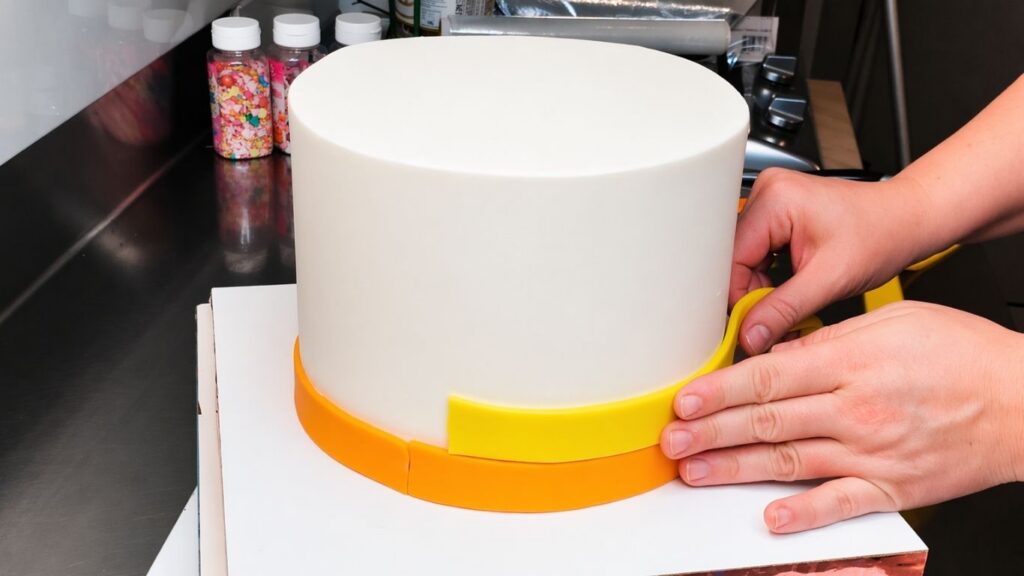
Lightly brush the back of each strip with a little water, then place it onto the buttercream. Smooth it gently with your fingers so it sits flat and clean.
As you add the next strip, shift it slightly so the seam does not line up in the same spot. The bands should sit side by side, not stacked on top of each other. This small offset makes the pattern look more intentional, and it also creates a nicer layout for the bows later, so the final candy cake looks balanced and polished.
Step 6: Finishing the decoration
To complete the look, attach the fondant bows where the color bands meet. Brush a very thin layer of water on the back of each bow, just enough to help it stick without making the fondant slippery.
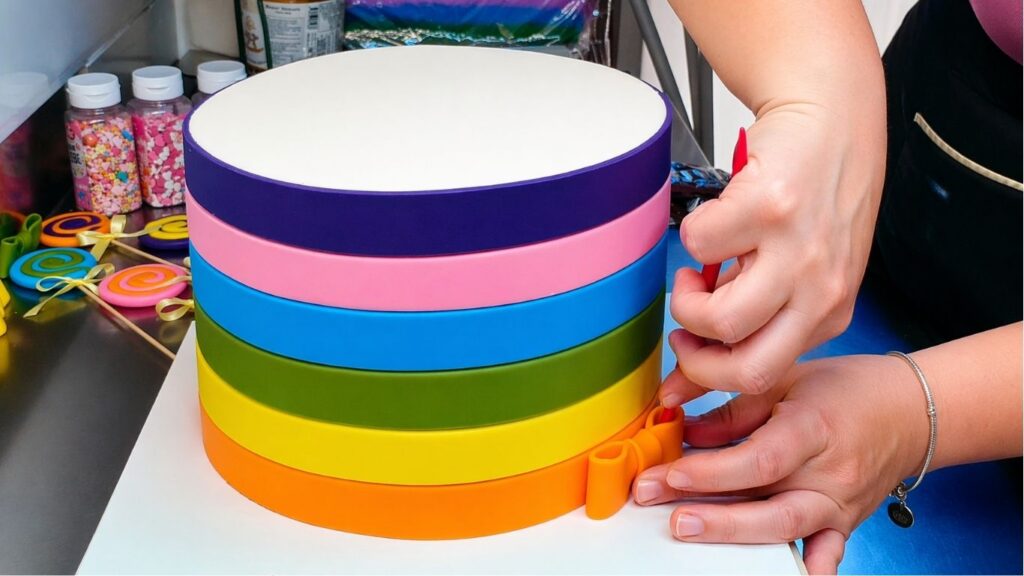
Place the bow directly over the seam between two fondant strips and press gently with your fingertips. Take a moment to adjust the position so it sits straight and looks centered.
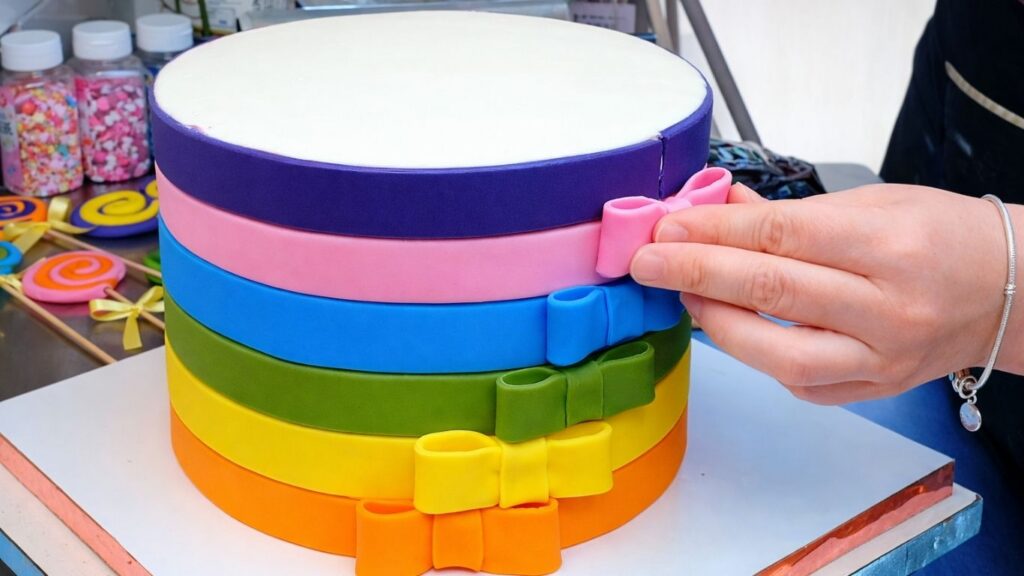
Continue around the cake, adding bows to the band seams until the design feels balanced. This step pulls everything together and gives your candy cake a clean, finished appearance.
Once the bows are attached, pour M&M’s over the top of the cake until the entire surface is covered. I cannot give an exact amount because it depends on the cake size. For my 8 inch (20 cm) cake, I used about five small packs of M&M’s.
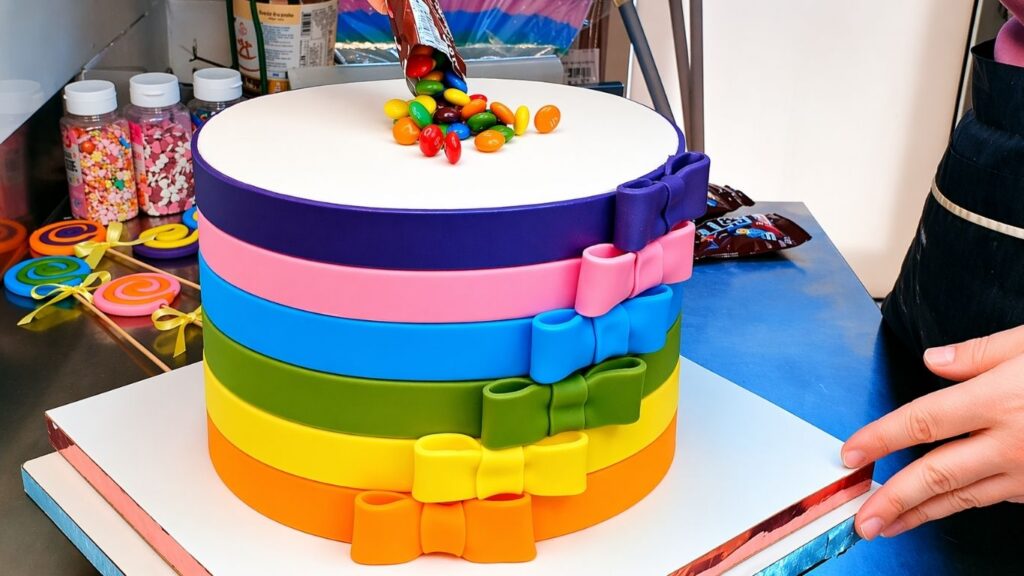

Spread them out evenly, then press very gently so they set into the buttercream. This helps the candies stay in place and prevents them from sliding off the candy cake.
Once the candies are in place, it is time to add the lollipops. Before inserting them, tie small satin ribbon bows around the sticks. This simple detail makes the topper look more elegant and finished.
After the bows are tied, arrange the lollipops on top of the candy cake. Place them evenly, mix colors for a balanced look, and angle a few slightly so the topper has depth. Gently press the sticks into the cake until they feel secure, then step back and adjust the spacing until everything looks neat from the front.
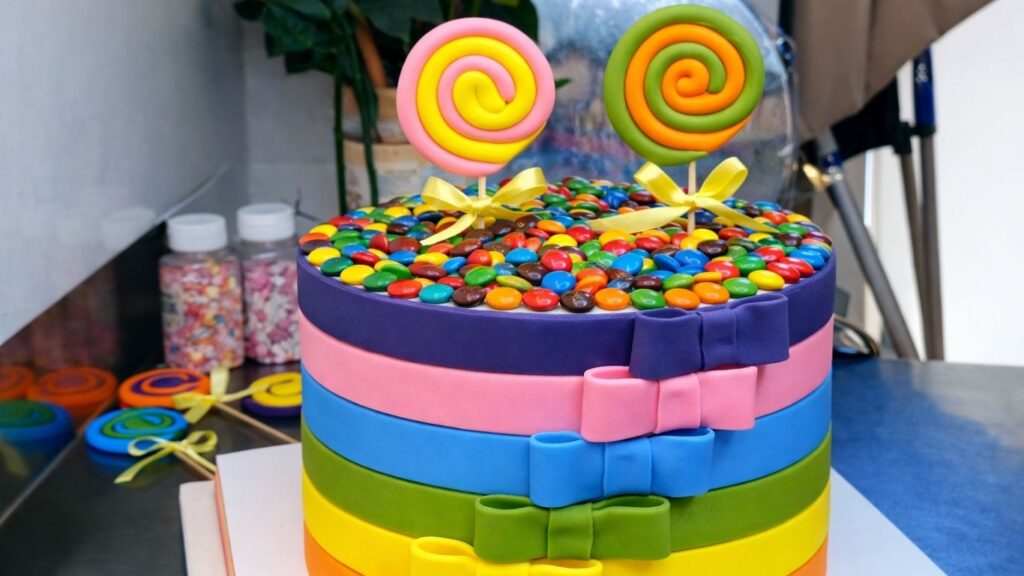
And just like that, your candy cake is finished. Give it a final look from all sides, adjust the lollipops if needed, and wipe the cake board clean so it is ready for photos and the party table.

Tips and Tricks for a Candy Cake
Chill between steps for a cleaner finish. A cold base keeps the buttercream firm, so your fondant bands stay straight and your candy topping does not slide.
Keep the buttercream layer smooth and set. Let the final coat firm up before adding fondant. This makes the surface more stable and helps the candy cake look neat from every angle.
Use water sparingly with fondant. Dip a small brush in water, then wipe off the excess. A thin layer is enough to attach bands and bows without making them slip.
Cut bands evenly for a professional look. Use the strip cutter, then line up your colors in order before you start attaching them. Consistent thickness makes the whole candy cake look more polished.
Offset the seams. Do not place every fondant strip join in the same spot. Staggering the seams looks more intentional and gives the bows a nicer placement.
Support tall toppers. If your fondant lollipops are on wooden skewers, press them into the cake firmly and space them out so the weight is balanced. This keeps the topper secure and prevents leaning.
Add ribbon bows before inserting lollipops. Tying the satin bows first is easier, and it keeps the topper looking tidy once everything is in place.
Press the candy topping gently. After adding M&M’s, lightly press them into the buttercream so they hold. This helps your candy cake stay clean while you move it to the table.
Frequently Asked Questions
Can I make a candy cake the day before the party?
Yes. Assemble the cake and finish the buttercream and fondant work the day before, then add the candy topping and lollipops closer to serving time for the cleanest look. Keep everything well covered and chilled as needed.
How long does a candy cake stay fresh?
Most cakes keep well in the refrigerator for several days when covered, but the exact time depends on the filling and frosting. If your cake has a perishable filling, follow stricter refrigeration rules and do not leave it out for long.
What is the best way to stick fondant pieces, bands, and bows?
A small amount of water works well for attaching soft fondant pieces because it slightly dissolves the sugar and becomes sticky. Use a thin layer with a brush so decorations do not slide.
My cake is sweating after the fridge. What should I do?
Condensation can happen when a cold cake hits warmer air. Let it sit and do not touch the surface too much, then gently dab moisture if needed. Avoid big temperature swings when possible.
How do I keep the lollipop toppers from leaning or falling?
Use sturdy sticks or skewers and space them evenly so the weight is balanced. For taller toppers, add internal support if the cake is soft, and insert the sticks into a firm, well chilled cake. This reduces shifting during transport.
Can I transport a candy cake safely?
Yes, but chill it first, keep it on a flat surface, and drive with the cake in the coolest part of the car. A non slip mat under the cake box also helps prevent sliding.
Will candy melt or bleed color on top of the cake?
It can if the cake is very warm or if there is moisture on the surface. A firm buttercream layer and a chilled cake help, and adding candy closer to the event reduces the risk of color bleeding.
Can I use different candy than M&M’s and still call it a candy cake?
Absolutely. Choose wrapped candies, gummies, or chocolate pieces that match your theme and hold their shape well at room temperature. The key is keeping the candy cake balanced and not overloaded.
Watch the Full Candy Cake Video Tutorial
Conclusion
This candy cake is the perfect way to create a colorful birthday centerpiece with a clean, professional look. Once the cake is chilled and coated smoothly, the fondant bands, bows, and handmade lollipops come together quickly, and the M&M topping adds the final fun finish.
You can easily customize this candy cake with different colors, candy choices, or a theme for any celebration. If you try it, I would love to see your version, and do not forget to watch the full video tutorial for every step.
Happy decorating!
Leave a Reply