📖 Table of Content:
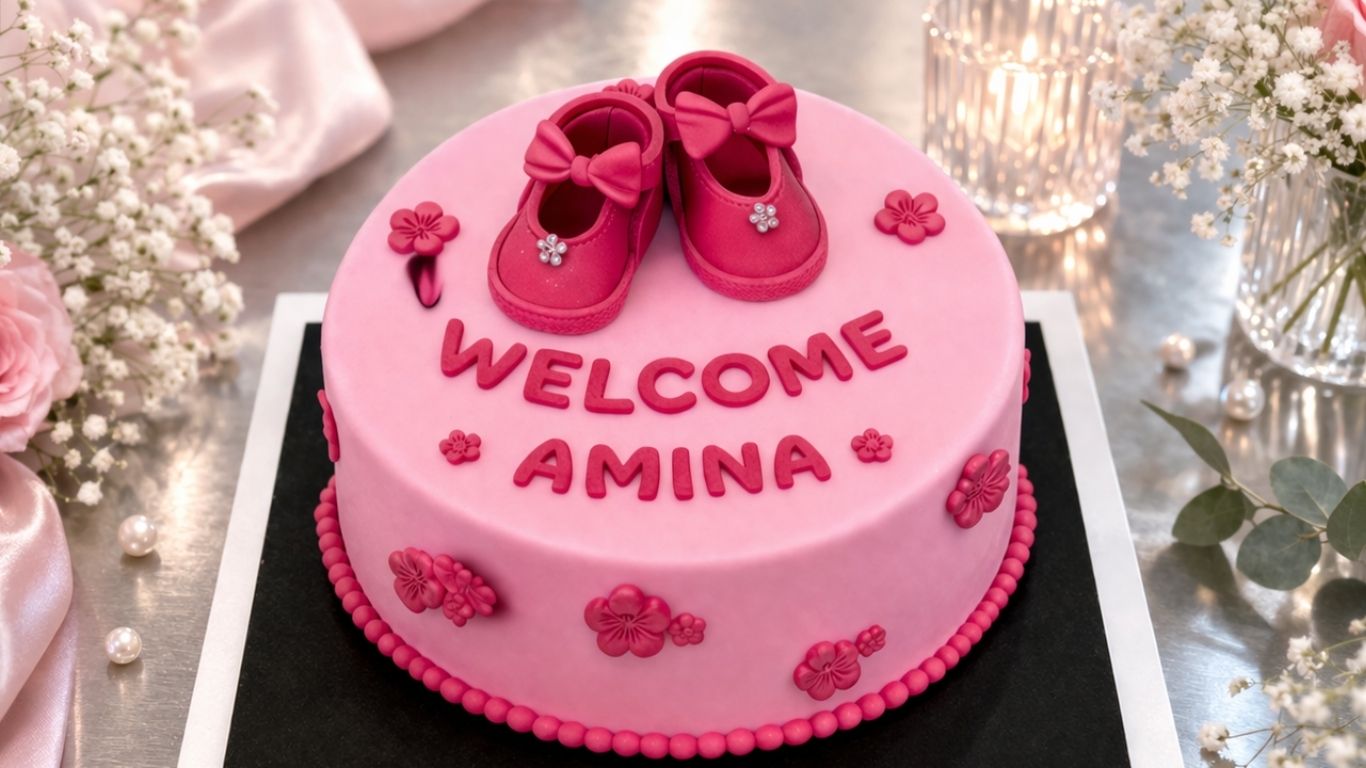
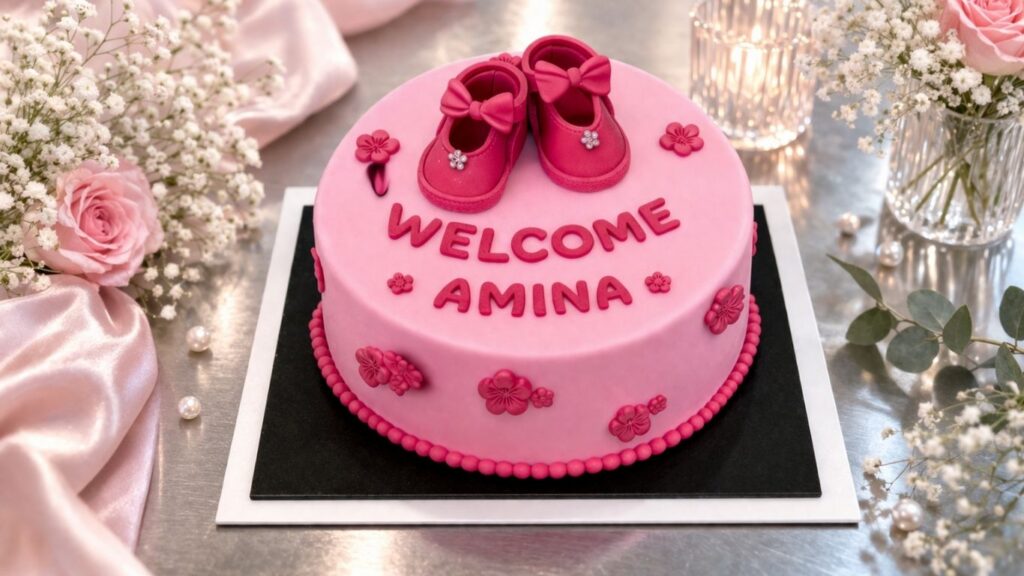
If you’ve ever wondered how to make fondant baby shoes that look this realistic and adorable, you’re in the right place. These sweet little pink baby shoes with bows are one of the most charming cake toppers you can create, and they are absolutely perfect for a baby shower cake, a welcome baby cake, or any celebration welcoming a new little girl into the world.
Fondant baby shoes may look complicated at first glance, but once you break the process down step by step, you will see that they are very achievable even if you are still building your cake decorating skills. The key is patience, a few simple tools, and good quality fondant that holds its shape well.
In this tutorial I will walk you through everything you need to know, from shaping the sole to adding those adorable little bows and finishing details that make these fondant baby shoes look so lifelike. By the end of this post you will have a pair of gorgeous fondant baby shoes ready to top your cake and impress everyone at the party.
Let’s get started!
Before we dive in, let me share a few things that will make this process much easier. Working with fondant requires a little practice, but once you get the feel for it, the possibilities are endless. If you are new to fondant, I recommend checking out this beginner’s guide to working with fondant from Wilton, which covers all the basics you need to know before getting started.
These fondant baby shoes are just one of the many ways you can use fondant to create stunning cake decorations. If you love elegant and delicious cakes as much as I do, make sure to check out my No Bake Pistachio Cake recipe, another showstopper that is perfect for any special occasion.
Now, let’s talk about what you will need to make these adorable fondant baby shoes!
MY LATEST VIDEOS
Quick Info
Prep Time: 30-40 minutes
Fondant Amount: about 10 oz (300g)
Tools Needed: template, scalpel, stitch tool, smoothing tool, rolling pin, brush, water for edible glue
Skill Level: Intermediate
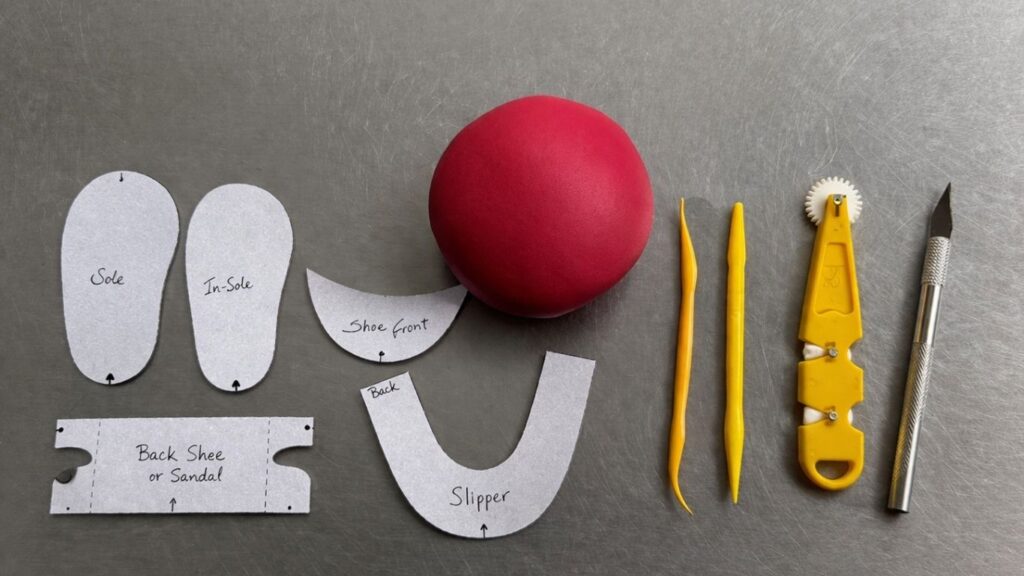
What You’ll Need for Fondant Baby Shoes Tutorial

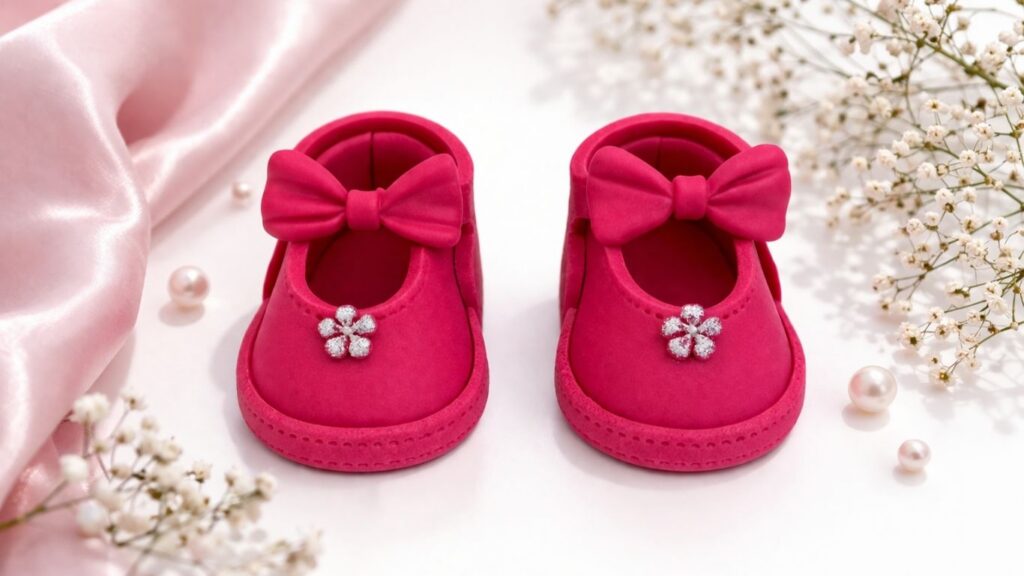
Fondant – You will need about 10 oz (300g) of fondant in your desired color. For these shoes we used a beautiful hot pink fondant that gives them that sweet and girly look. Make sure your fondant is well kneaded and smooth before you start working with it. If it feels too stiff, knead it in your hands for a few minutes until it becomes soft and pliable. Good quality fondant that holds its shape is the key to getting clean and realistic results.
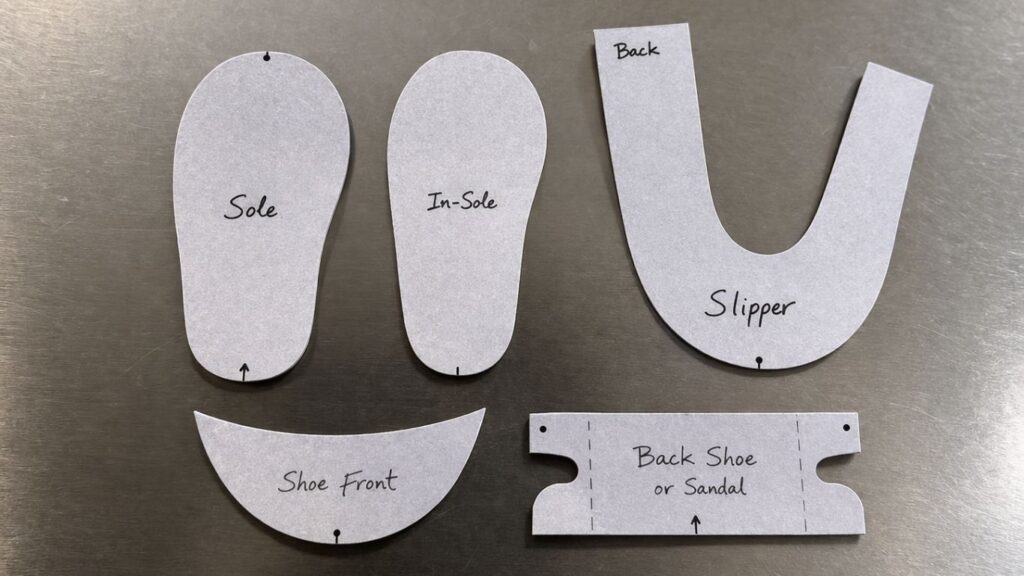
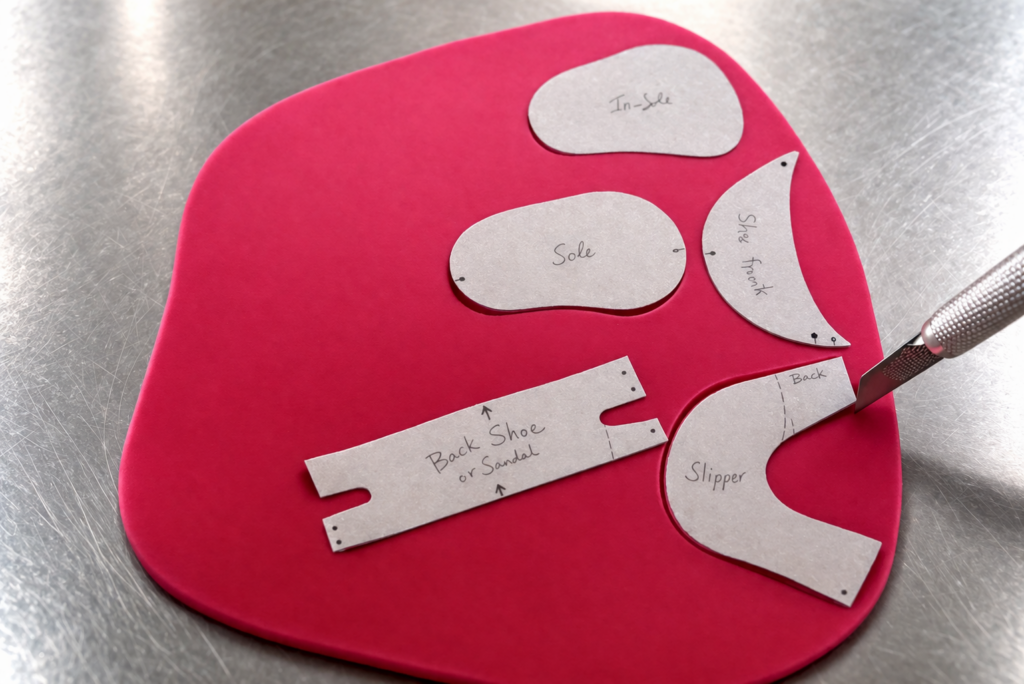
Template – A paper template is your best friend when making fondant baby shoes. It includes all the pieces you need: Sole, In-Sole, Shoe Front, Back, Slipper, and Back Shoe or Sandal strap. You can easily find a free template online, print it out, and cut each piece carefully with scissors. Having a template ensures that both shoes come out the same size and shape, which makes a huge difference in the final result.
Scalpel – A sharp craft scalpel is essential for cutting clean and precise fondant pieces. Unlike a regular knife, a scalpel gives you smooth and accurate edges without dragging or tearing the fondant. It is one of those tools that once you start using it, you will never go back.
Modeling Tools – Two modeling tools are used throughout this tutorial for shaping, smoothing, and adding fine details to your fondant pieces. The pointed tip is great for getting into tight corners and creating fine lines, while the wider end is perfect for smoothing and blending.
Stitch Tool – This little wheel tool is what gives the shoes that realistic and professional finish. Simply roll it along the edges of each fondant piece to create beautiful stitch marks that make the shoes look just like the real thing.
Water and Brush – A small brush and a little bit of water act as your edible glue throughout this tutorial. Use it to attach all the fondant pieces together. A little goes a long way, so make sure to apply it lightly for a clean finish.
Why You Will Love This Tutorial
These fondant baby shoes are one of those projects that look incredibly impressive but are actually very achievable once you follow the steps. Whether you are making a cake for a baby shower, a welcome baby celebration, or just want to add a special handmade touch to your next cake, these little shoes will steal the show every single time.
Here are a few reasons why this tutorial is perfect for you. The steps are clear and easy to follow, so even if you are still building your fondant skills you will be able to create a beautiful result. Everything is done by hand with simple tools that you probably already have in your cake decorating kit. The template does most of the hard work for you, so you do not have to worry about getting the shape just right. And best of all, the finished fondant baby shoes look so realistic and detailed that everyone will be amazed they are made entirely from fondant.
Once you make these, they will quickly become one of your go-to cake toppers for any baby celebration!
How to Make fondant Baby Shoes
1. Prepare Your Template, Fondant and Tools
Before you start, make sure you have everything ready and within reach. Print out your baby shoe template and cut out each piece carefully with scissors. Having your template pieces ready before you start will make the whole process much smoother and stress free.
Take your fondant and knead it well with your hands for a few minutes before you begin rolling it out. This is an important step that many people skip, but it makes a big difference. Kneading warms up the fondant and makes it softer, more pliable, and much easier to work with. You will notice it becomes smoother and more elastic as you knead it, which means it will roll out evenly and hold its shape much better.
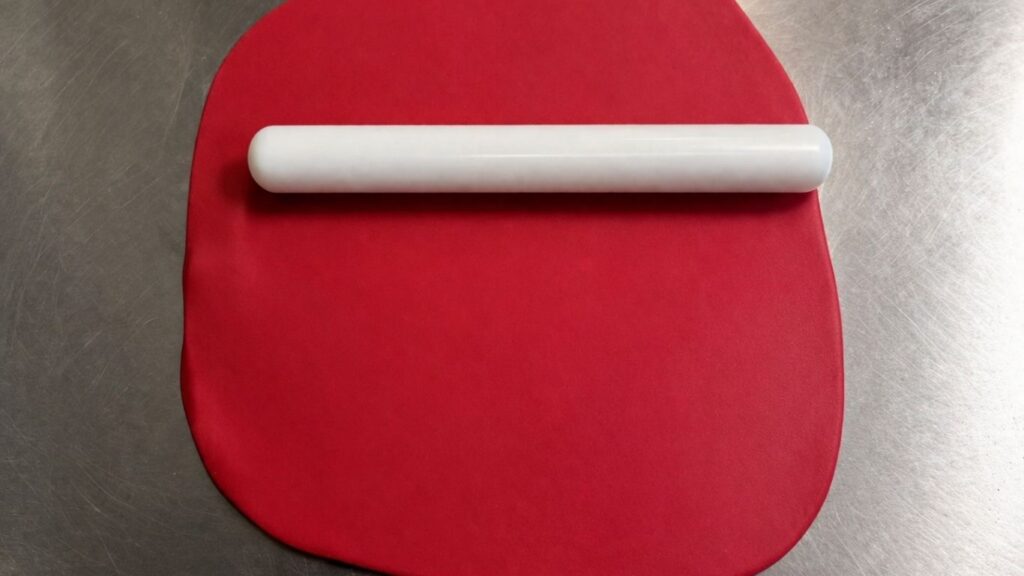
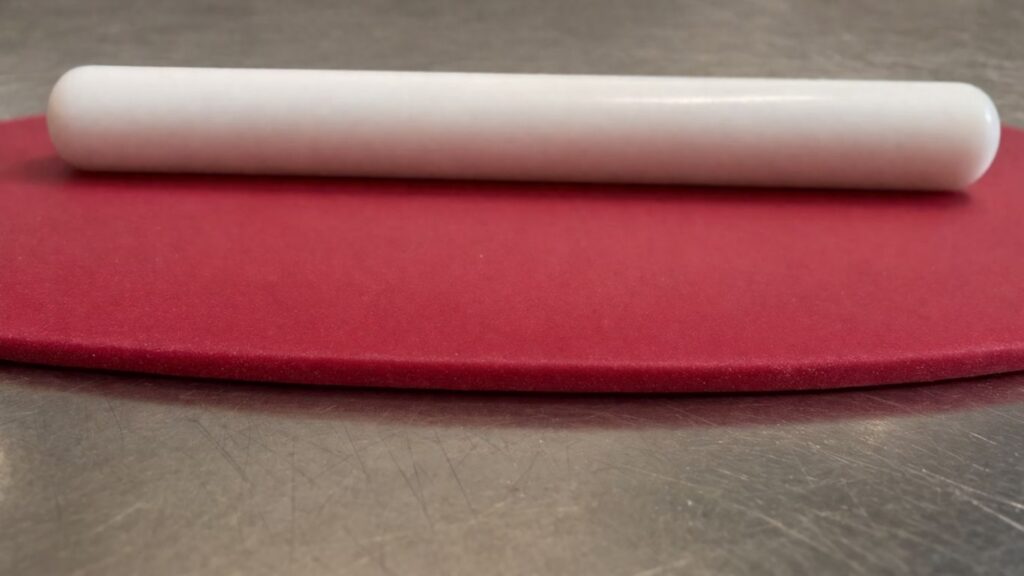
Once your fondant is soft and ready, lightly dust your work surface and roll it out evenly. The ideal thickness for these baby shoes is about 1/8 inch (3mm). This thickness gives the pieces enough structure to hold their shape while still being easy to cut and mold. If you go too thick the shoes will look heavy and bulky, and if you go too thin the fondant may tear or not hold up well. A thickness of around 1/8 inch is the sweet spot that gives you the best results.
Now lay your template pieces on the rolled out fondant and you are ready to start cutting!
2. Cut Out the Fondant Pieces Using the Template
Once your fondant is rolled out to the right thickness, carefully place your template pieces flat onto the fondant, making sure they are laying nice and smooth without any wrinkles or lifted edges. Take a moment to arrange all the pieces before you start cutting so you can fit everything onto the fondant without wasting any.
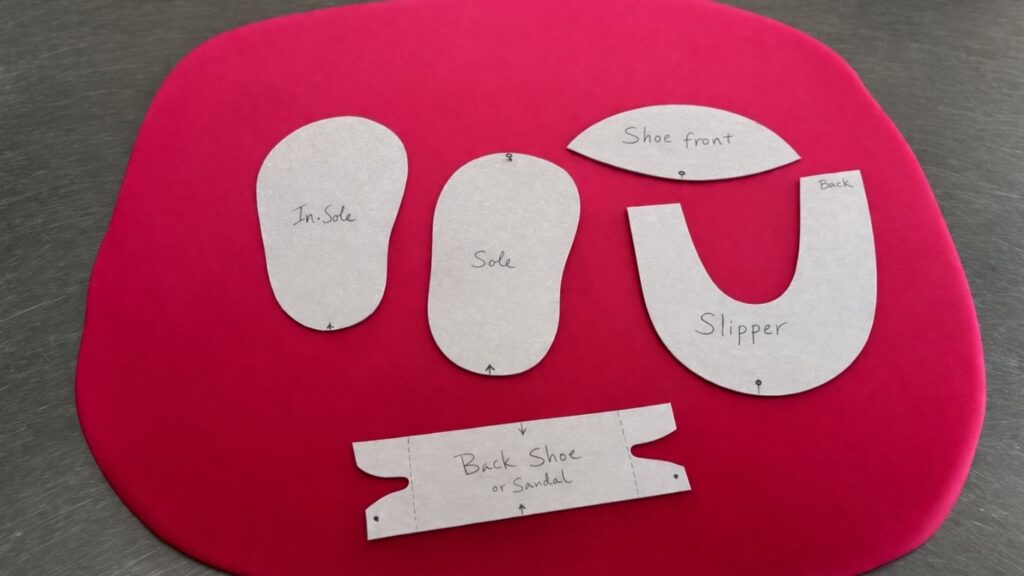
Now take your scalpel and slowly and carefully trace around each template piece with light and steady strokes. There is no need to rush this step. The more patient and precise you are with your cutting, the cleaner and more defined your shoe pieces will be. Always cut away from your fingers and keep the scalpel as straight as possible to get smooth clean edges.
Once you have cut out all the pieces, gently remove the template and carefully lift each fondant piece. You should now have all the parts you need to start assembling your fondant baby shoes, including the sole, in-sole, shoe front, back, and slipper pieces.
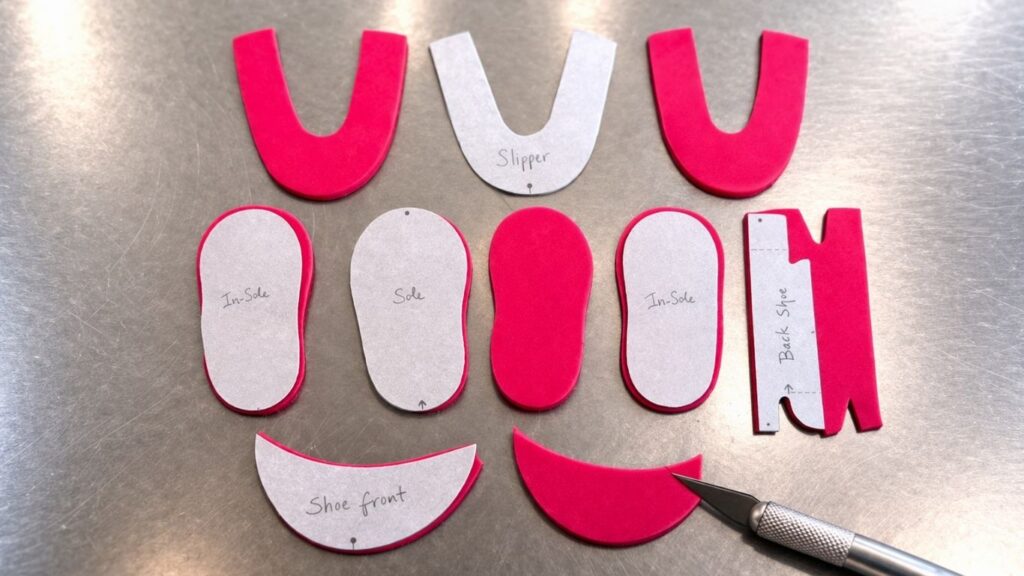
Take your time with this step because clean and precise cuts make a huge difference in the final look of your shoes!
3. Assembling the Fondant Baby Shoe
Now the fun begins! It is time to start putting the shoe together piece by piece. We will start with the base of the shoe, which is the sole and the in-sole.
Take your brush and dip it lightly into water. Apply a thin and even layer of water onto the surface of the sole. Remember that water acts as your edible glue here, so you do not need a lot. Just a light and even coat is enough to create a strong bond between the pieces. Too much water can make the fondant soggy and cause the pieces to slide around, so always use it sparingly.
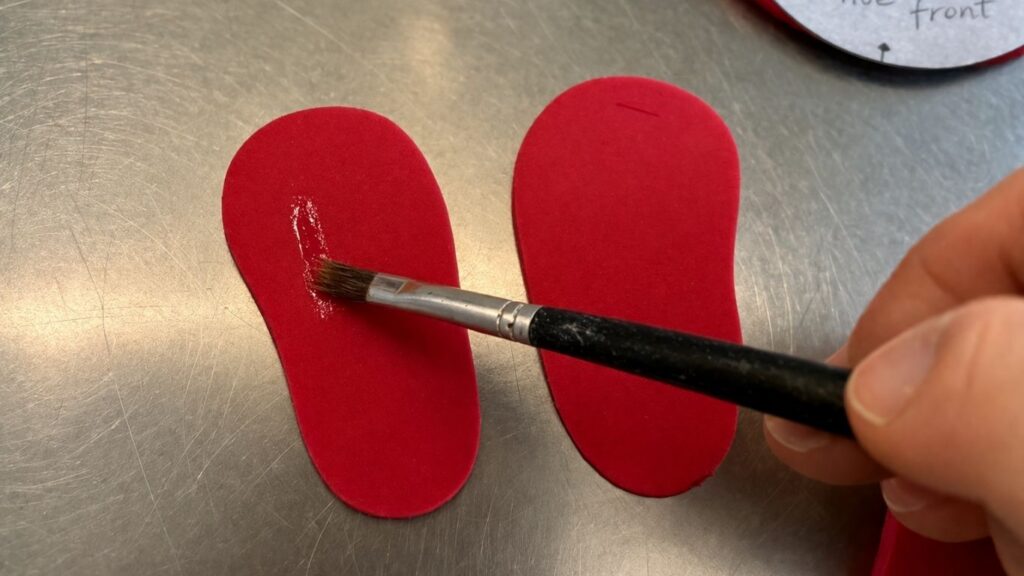
Carefully place the in-sole on top of the sole, pressing it down gently but firmly so it sticks nicely. Make sure the edges are aligned and the pieces are sitting flat and even. Run your finger gently around the edges to smooth everything out and make sure there are no lifted corners.
Repeat the exact same process for the second shoe. Take your time and make sure both shoes look identical before moving on to the next step.
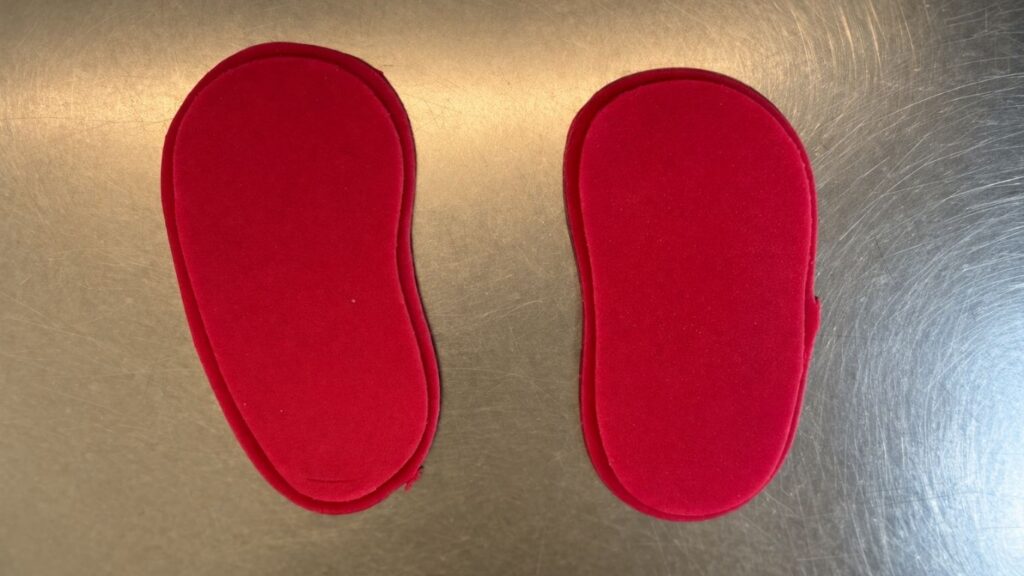
Once both shoes have the sole and in-sole attached, set them aside for a moment and take a look at your two bases side by side. This is the foundation of your fondant baby shoes and getting this part right sets you up for a beautiful result in the steps ahead!
4. Attaching the Front Upper Part of the Shoe
Now it is time to start building up your fondant baby shoes and giving them that real shoe shape. This step is where things really start to come together!
Take your brush and apply a thin layer of water along the outer edge of the sole, all the way around. This is where the upper part of the shoe will be attached, so make sure the water is applied evenly along the entire edge.

Now carefully take the shoe front piece and start attaching it to the sole, beginning from the front and working your way towards the back. Press it gently along the edge of the sole, making sure it sits upright and follows the natural curve of the shoe shape. The front piece should wrap smoothly around the front of the fondant baby shoes and extend all the way to the back on both sides.
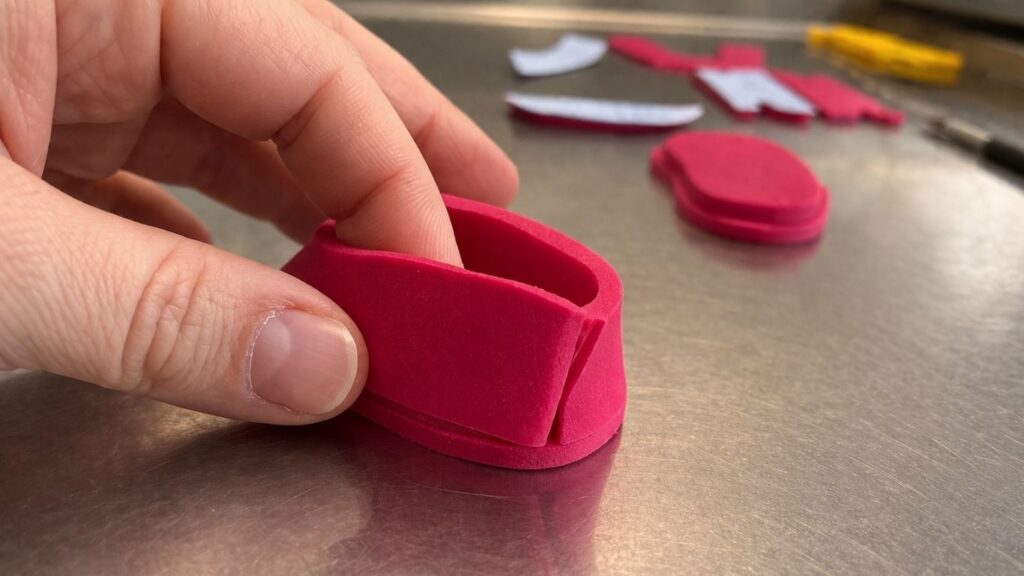
Take a step back and check how the shoe looks from the front and from behind. The upper should be sitting straight and even on both sides. Repeat the same process for the second shoe before moving on to the next step.
Once the piece is in place, take your modeling tool and gently press along the bottom edge where the upper meets the sole. Work your way slowly around the entire shoe, pressing firmly but carefully to make sure the two pieces are fully bonded together. This also helps blend the seam and gives the shoe a clean and professional finish.
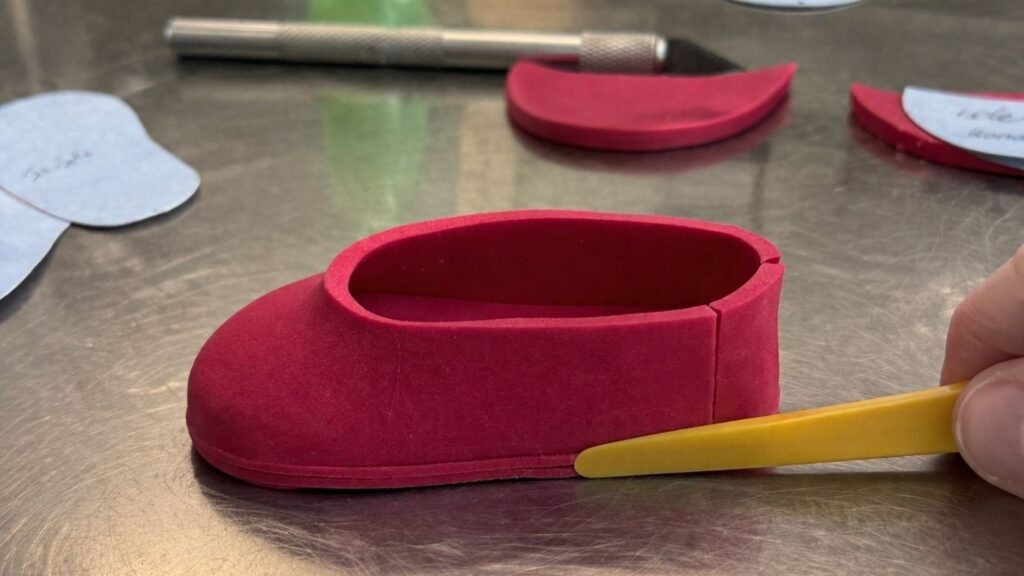
5. Attaching the Back and Adding the Sole Border
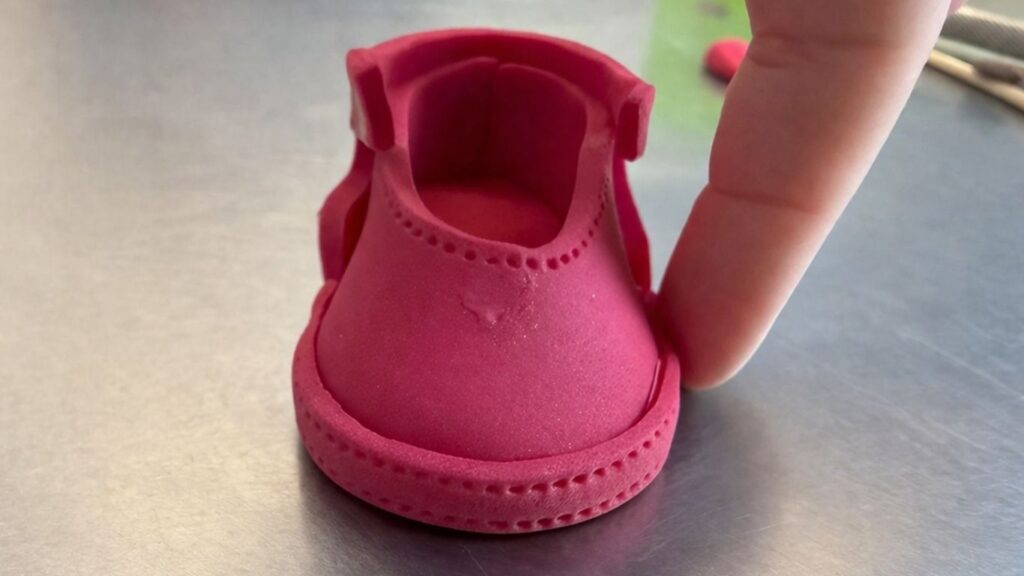
Now it is time to close up the back of your fondant baby shoes and add that beautiful finishing border around the sole.
Take the back piece and apply a thin layer of water along the edges where it will be attached. Carefully place it onto the back of the shoe, pressing it gently into position. Make sure it sits evenly and aligns nicely with the front upper piece on both sides. Once it is in place, take your modeling tool and gently press along the edges to secure it and blend the seam for a clean and smooth finish.
Now it is time to add the border around the sole of the shoe, which is one of those small details that makes a huge difference in the overall look of your fondant baby shoes. Roll out a thin strip of fondant about 1/4 inch (0.5 cm) wide and long enough to go around the entire sole of the shoe.
Apply a thin layer of water along the very edge of the sole where the border will sit. Starting from one side, carefully press the strip onto the edge of the sole, working your way slowly around the shoe. Take your time and make sure the strip is sitting evenly and smoothly as you go.

Once the strip is all the way around, gently press it down with your finger, working along the entire border to make sure it is fully attached and sitting flat. This little border gives your fondant baby shoes that polished and realistic look, just like a real shoe sole!
Repeat the same steps for the second shoe before moving on.
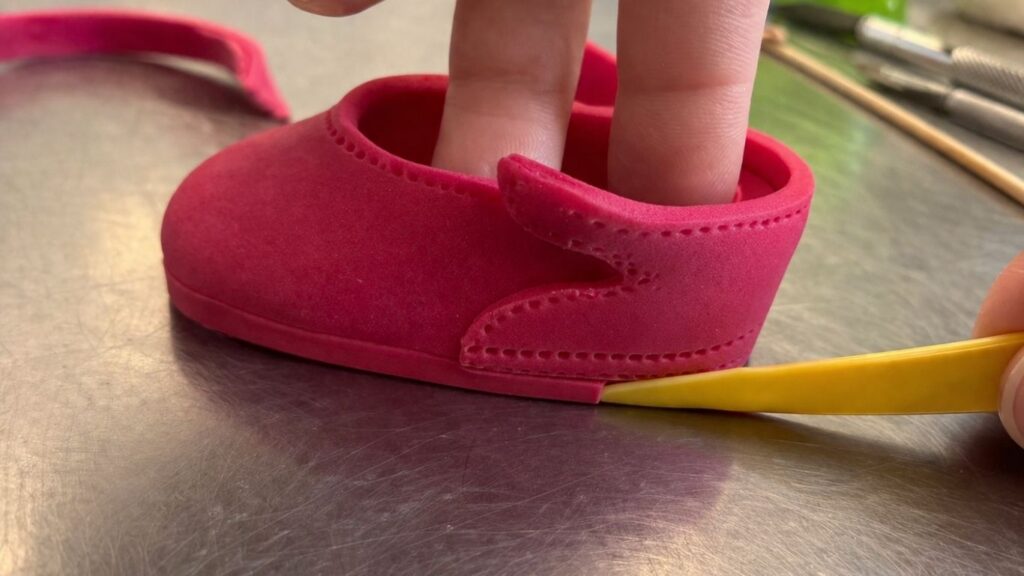
6. Adding the Stitch Detail and Bow
Now we are getting to the details that really bring these fondant baby shoes to life!
Take your stitch tool and gently roll it along the border strip that you attached around the sole in the previous step. Apply light and even pressure as you work your way around the entire edge of the shoe. This creates beautiful and realistic stitch marks that give your fondant baby shoes that authentic handcrafted look. Take your time with this step and keep the stitch tool as straight as possible for clean and even results.
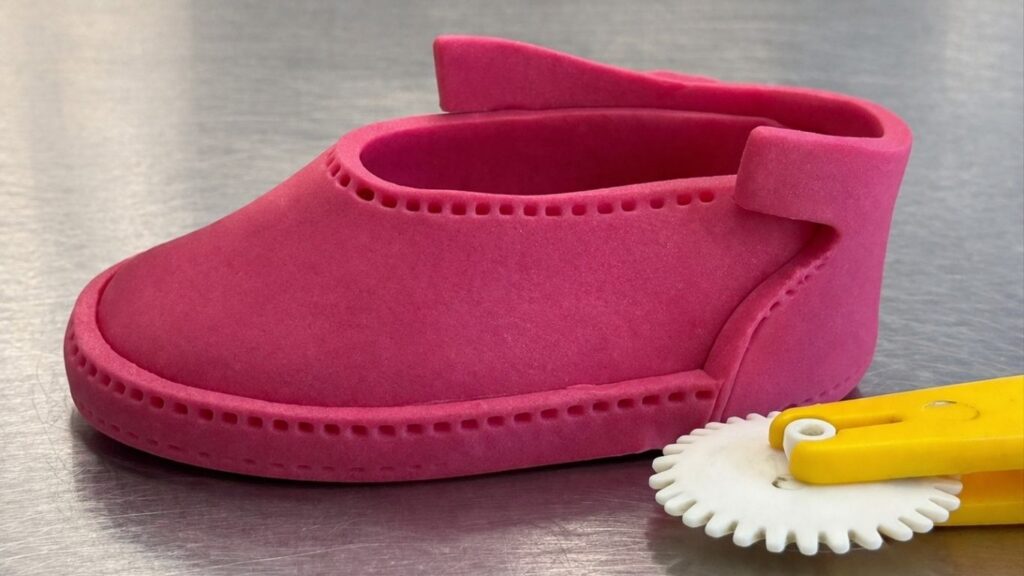
One little note before we move on. For these particular fondant baby shoes I decided to skip the shoe front piece and I love how they turned out. Without it they look even sweeter and more delicate, which is perfect for a baby girl. When I make fondant baby shoes for boys I always add the shoe front piece because it gives them more of a sneaker look which suits the style perfectly. So feel free to play around with this depending on the look you are going for!
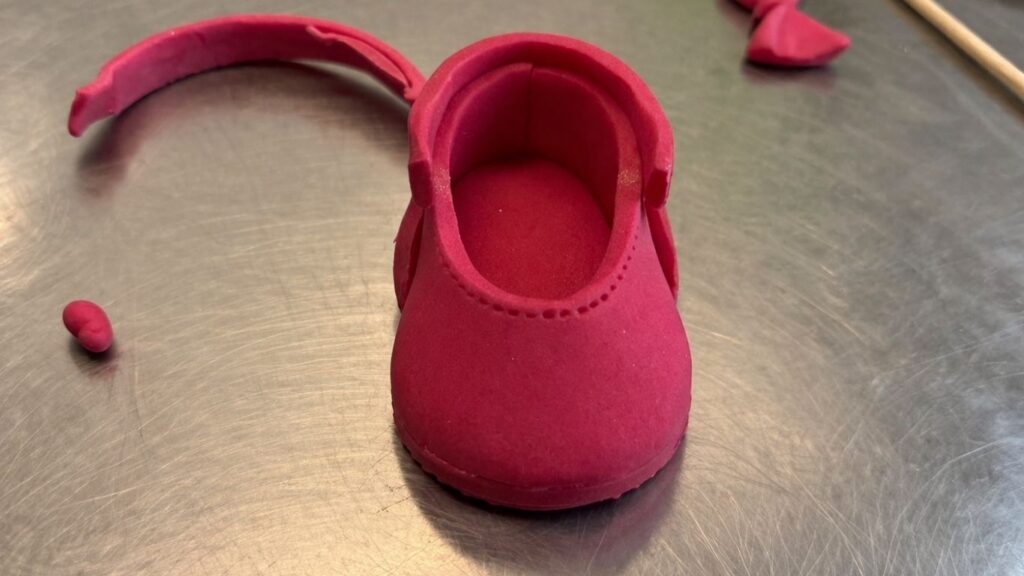
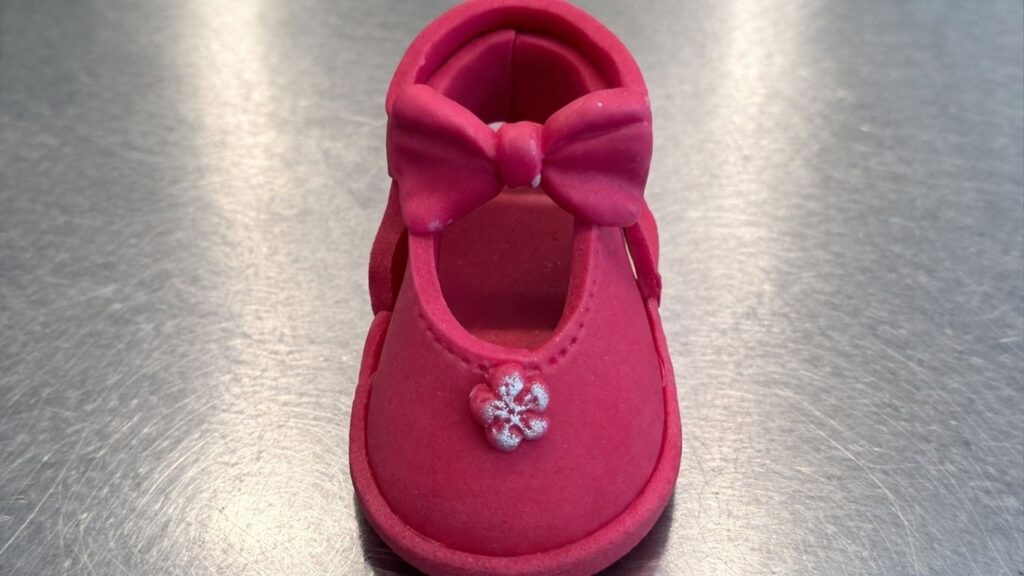
Now it is time to make the bow, which is the star detail on these adorable fondant baby shoes! You can shape the bow by hand or use a bow mold if you have one available. I used a mold for this tutorial which gives a beautifully clean and defined bow shape every single time. Simply press a small piece of fondant firmly into the mold, making sure it fills every corner, then carefully pop it out and let it firm up slightly before attaching it to the shoe.
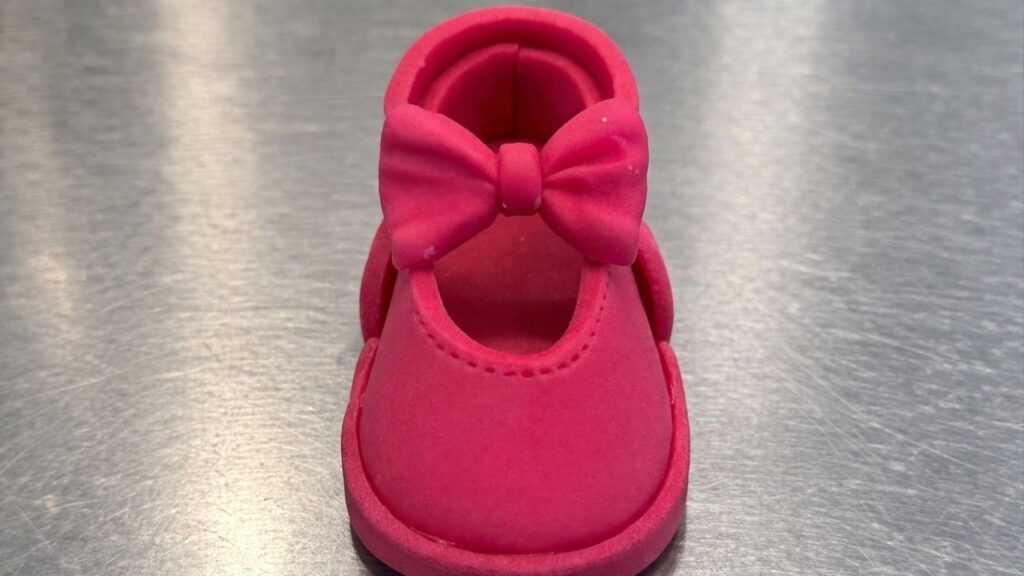
If you want to add an extra sweet touch to your fondant baby shoes, you can also place a tiny fondant flower right in the center of the front of the shoe. It is a small detail but it adds so much charm and makes the shoes look even more special and finished. Apply a tiny drop of water to the back of the flower and press it gently into place.
Your Fondant Baby Shoes Are Ready!
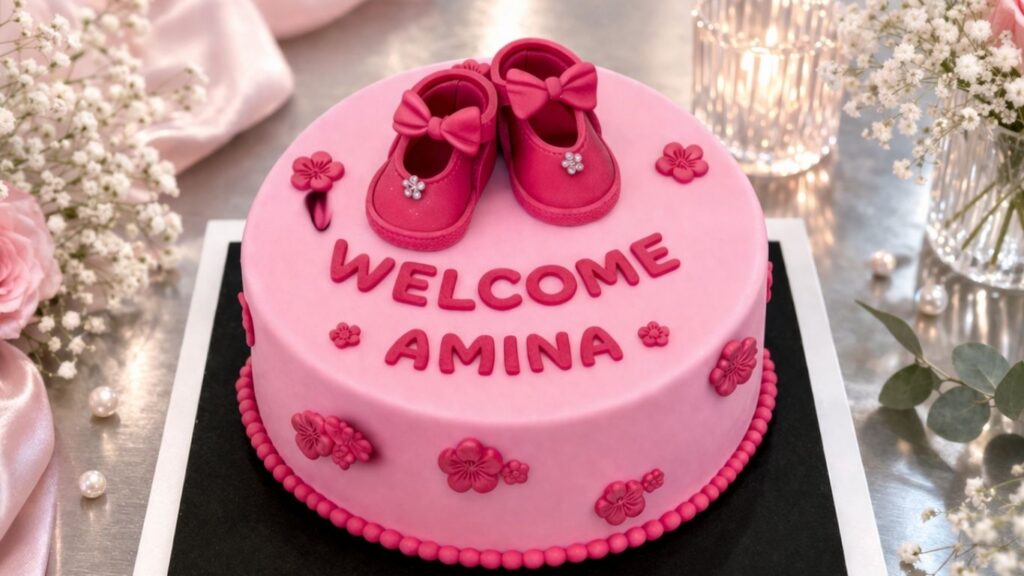
And that is it, your fondant baby shoes are done and they look absolutely adorable! Now comes the best part, placing them on top of your cake and seeing the whole design come together. Whether you are decorating a baby shower cake, a welcome baby cake, or any other celebration cake for a little one, these sweet little shoes will make it look truly special and unforgettable.

I hope this tutorial showed you that making fondant baby shoes is much easier than it looks. With a little patience, the right tools, and some good quality fondant, anyone can create these charming little details. Once you make your first pair you will see just how quick and fun the process really is!
Now go ahead and decorate your cake, you are going to love how it turns out! 🎀
Frequently Asked Questions
Can I make fondant baby shoes in advance?
Yes, absolutely! Fondant baby shoes can be made several days or even up to two weeks in advance. Store them in a cool and dry place, away from direct sunlight and humidity. Do not store them in the refrigerator as moisture can cause the fondant to soften and lose its shape.
What type of fondant works best for this tutorial?
Any good quality modeling fondant or a mix of regular fondant and gum paste works great for this project. Gum paste dries harder and faster which is ideal for detailed figurines and cake toppers like these fondant baby shoes. Avoid using fondant that is too soft or sticky as it will be difficult to work with and will not hold its shape well.
Can I color my own fondant?
Absolutely! You can start with white fondant and color it yourself using gel food coloring. Gel colors give you vibrant and rich results without changing the consistency of your fondant. Simply add a small amount of gel color and knead it in until the color is evenly distributed throughout the fondant.
How do I store the finished cake with fondant baby shoes on top?
If the fondant baby shoes are already placed on the cake, store the cake in a cool and dry place. Avoid refrigerating a fondant decorated cake if possible as condensation can cause the fondant to become sticky and lose its finish.
Can beginners make these fondant baby shoes?
Yes! While this tutorial is rated as intermediate, it is very beginner friendly as long as you follow the steps carefully and take your time. The template makes the whole process much easier because all the hard work of getting the shapes right is already done for you.
What size are these fondant baby shoes?
The size of your fondant baby shoes will depend on the template you use. For a standard cake topper, a shoe length of about 2 to 2.5 inches works perfectly and looks proportional on most cake sizes.
Conclusion
I hope you enjoyed this fondant baby shoes tutorial and that it inspired you to create your own little pair for your next special cake. These sweet little shoes are one of those cake toppers that never fail to make everyone smile, and once you master the technique you will find yourself making them again and again for every baby celebration that comes your way.
Remember that practice makes perfect, so do not be discouraged if your first pair is not exactly how you imagined. Every time you make them you will get faster, more confident, and your results will keep getting better and better.
If you make these fondant baby shoes I would love to see how they turned out! Leave a comment below and share your experience, and feel free to ask any questions you might have. I am always happy to help!
Happy decorating! 🎀
Leave a Reply